
Embarking on a kitchen remodel is one of the most rewarding investments you can make in your Orange County home, but without a clear plan, it can quickly become overwhelming. That’s why having a comprehensive checklist for remodeling kitchen is not just helpful—it is essential for a seamless, stress-free experience. As a BBB Torch Award-winning, IICRC Master Certified General Contractor, Sparkle Restoration Services has guided countless discerning homeowners in Southern California through this exact process, transforming outdated spaces into the functional, luxurious hubs of the home.
This guide distills our decades of expertise into an actionable, phase-by-phase roadmap. It is designed specifically to ensure your project runs smoothly, stays on budget, and delivers the stunning, high-end results you deserve. We move beyond generic advice to provide the specific insights and professional secrets needed to navigate every critical decision. From initial budgeting and layout design to selecting premium finishes and coordinating with skilled artisans, this checklist covers it all.
Our purpose is to turn the potential chaos of renovation into a calm, controlled, and ultimately exciting journey. While this guide focuses intently on the heart of your home, you may find an ultimate home renovation checklist helpful for a broader overview of any major home project. Let’s begin crafting the kitchen you’ve always envisioned, ensuring every detail reflects your lifestyle and enhances your home’s value.
1. Create a Realistic Budget and Financing Plan
Before the first hammer swings, the most critical step in your kitchen remodel checklist is establishing a comprehensive and realistic budget. This foundational document will guide every decision, from material selection to contractor hiring, ensuring your project stays on track without causing financial strain. For our Orange County clients, a well-structured budget is more than a simple number; it’s a strategic plan for allocating resources effectively.
The scope of kitchen remodels varies significantly, influencing the overall investment. For instance, a cosmetic update with IKEA components might range from $10,000 to $15,000. A more common mid-range renovation, featuring semi-custom cabinetry from brands like KraftMaid, often lands between $30,000 and $50,000. For those seeking the pinnacle of luxury, a high-end remodel with Sub-Zero/Wolf appliances and bespoke European cabinetry can easily exceed $100,000.
Actionable Budgeting Tips
To build a precise and manageable budget, consider these expert recommendations:
- Secure Multiple Bids: Always obtain at least three detailed, itemized quotes from licensed and reputable general contractors. This provides a clear picture of local labor and material costs in the Southern California market.
- Allocate for a Contingency: Set aside 15-20% of your total budget as a contingency fund. This is not a “nice-to-have”; it’s an essential buffer for unforeseen issues like hidden plumbing problems or structural surprises discovered during demolition.
- Track Every Expense: Use a detailed spreadsheet or a dedicated budgeting app to log every single purchase, from the initial design consultation fee to the final light switch cover. This prevents small costs from accumulating unnoticed.
- Strategic Phasing: If your complete vision exceeds your current budget, consider phasing the project. You could install the core components now (cabinetry, countertops, appliances) and add a custom tile backsplash or high-end lighting later.
The following pie chart visualizes a typical budget allocation for a mid-to-high-end kitchen remodel, helping you understand where your investment will likely go.
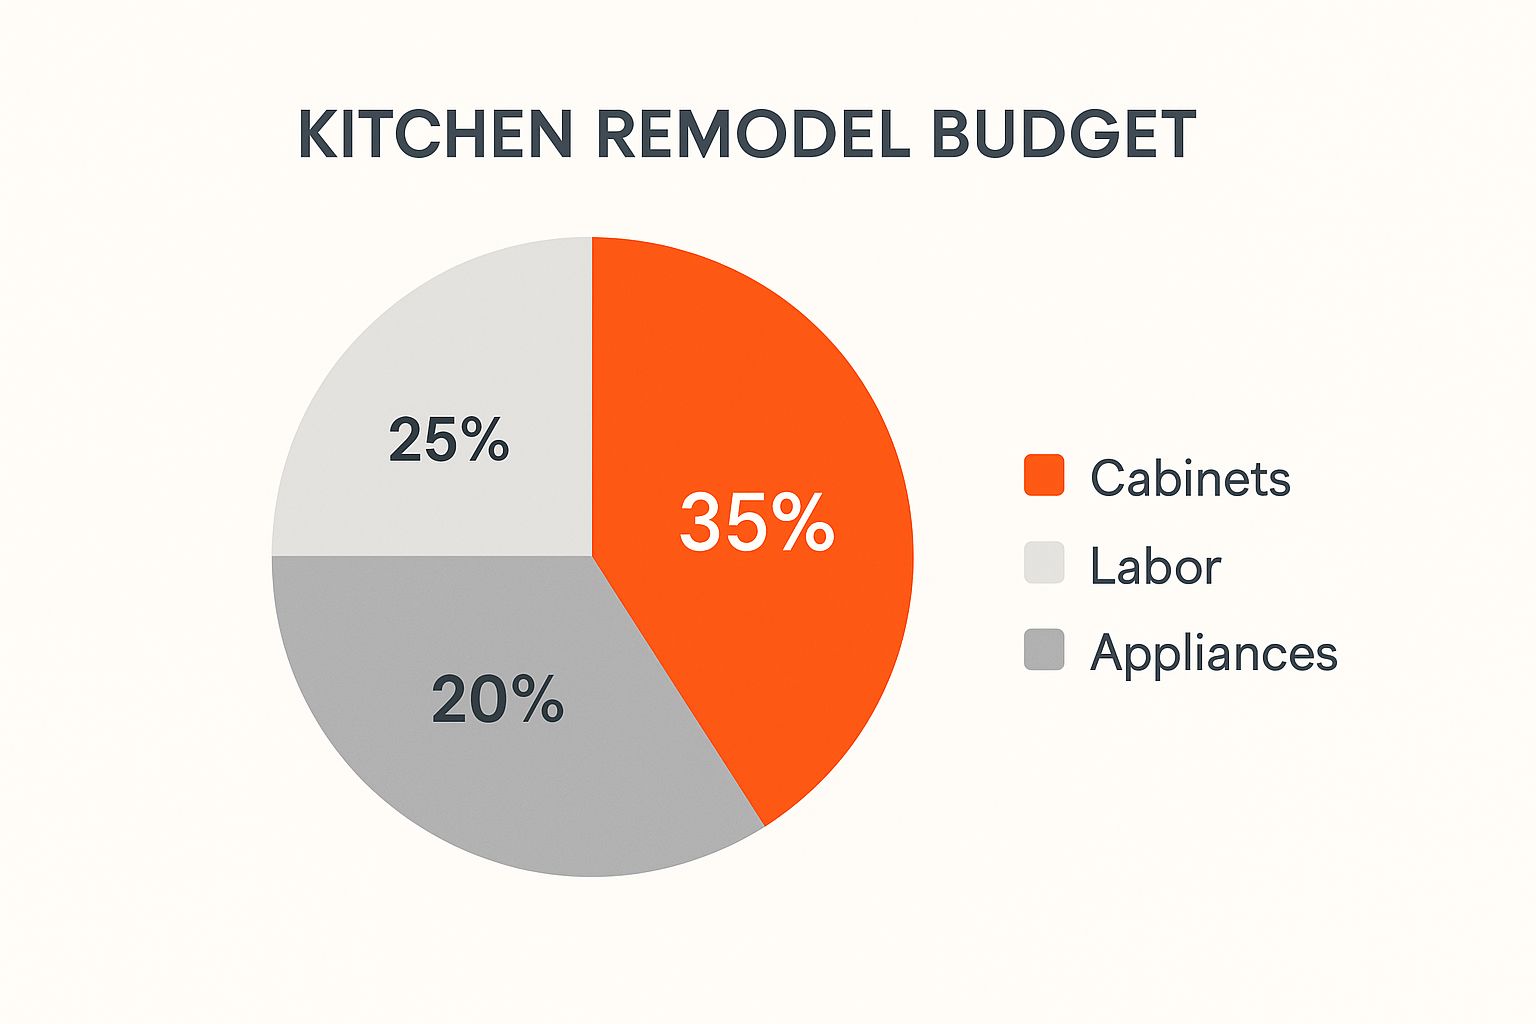
This chart highlights that cabinetry and labor represent the largest portions of the budget, underscoring the importance of selecting the right materials and skilled professionals for your project. As you define your financial plan, understanding the local market is crucial; for expert guidance on establishing a budget for your project, you can get insights from professionals who specialize in kitchen remodeling in Huntington Beach, CA.
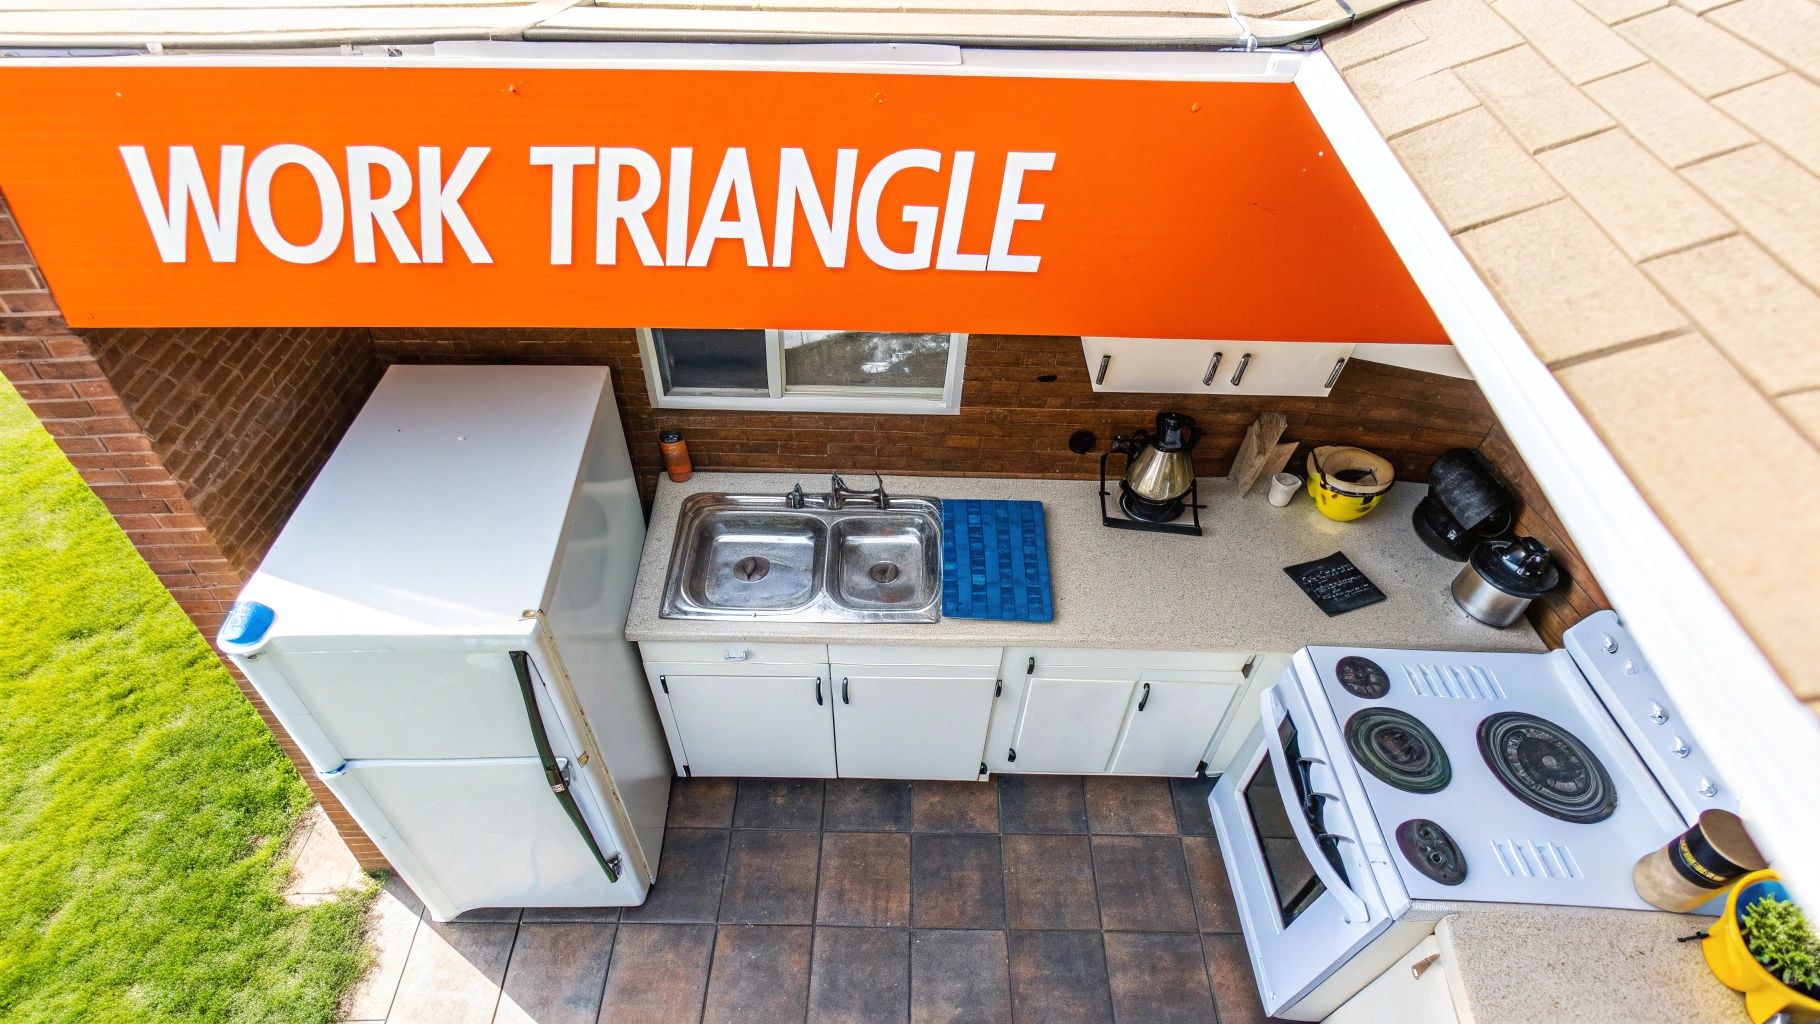
2. Design Layout and Optimize Workflow (Kitchen Triangle)
Once your budget is set, the next pivotal item on your checklist for remodeling a kitchen is designing a functional and elegant layout. The arrangement of your kitchen’s core components dictates its efficiency, flow, and overall user experience. This phase involves critical decisions about whether to maintain the existing footprint or undertake a more ambitious reconfiguration of walls, plumbing, and electrical systems to achieve your ideal workflow.
A well-designed kitchen layout is the backbone of a successful remodel, blending aesthetics with uncompromising functionality. The classic “kitchen work triangle” remains a cornerstone of efficient design, connecting the refrigerator, stove, and sink. For optimal movement, the National Kitchen and Bath Association (NKBA) recommends that each leg of the triangle measure between 4 and 9 feet, with the total distance not exceeding 26 feet. Modern design, popularized by innovators like Joanna Gaines, expands on this with “work zones” dedicated to specific tasks like prepping, cooking, cleaning, and storage, which is especially effective in open-concept layouts featuring a central island.
Actionable Layout & Workflow Tips
To create a layout that is both beautiful and practical, integrate these expert-backed guidelines into your design process:
- Visualize with Software: Utilize design tools like SketchUp, RoomSketcher, or IKEA’s Kitchen Planner to create 2D and 3D mockups. This allows you to experiment with different configurations and visualize the space before committing.
- Prioritize Landing Space: Ensure adequate counter space around key appliances. The NKBA suggests at least 15 inches of “landing space” on the handle side of the refrigerator and on either side of a cooktop for safety and convenience.
- Optimize the Cleaning Zone: Position your dishwasher within 36 inches of the sink. This minimizes drips and simplifies the process of rinsing and loading dishes.
- Ensure Proper Clearances: Account for appliance door swings and create comfortable walkways. A minimum of 42 inches is recommended for a single-cook kitchen, while 48 inches is ideal for a two-cook space.
The following video provides an excellent visual guide to understanding and applying kitchen layout principles for maximum efficiency.
Mapping out an intuitive workflow is a complex task that merges design theory with practical application. A professional design-build team can help translate your vision into a highly functional and beautiful space. To learn more about how a professional can help you navigate complex layout decisions, get insights from experts in high-end remodeling and construction.
3. Select Cabinetry Style and Storage Solutions
As the most dominant visual and functional element, cabinetry is the heart of your kitchen’s design and a cornerstone of your remodeling checklist. Typically representing 30-40% of the total project investment, this decision significantly influences both the aesthetic and the daily usability of your space. This phase involves a careful selection of cabinet type, door style, materials, finishes, and hardware, all while integrating smart storage solutions.
The cabinetry market offers a wide spectrum of options, each with distinct price points and levels of customization. For instance, stock systems like IKEA’s SEKTION offer modern, modular solutions that can be configured for many kitchens, often ranging from $4,000 to $10,000. Semi-custom brands like KraftMaid provide more flexibility in sizes and finishes, with an average investment of $15,000 to $30,000. For a truly bespoke kitchen, custom cabinetry from local artisans or luxury brands like Poggenpohl provides limitless possibilities, with costs starting at $40,000 and climbing significantly higher.
Actionable Cabinetry & Storage Tips
To select cabinetry that combines timeless style with peak functionality, consider these expert recommendations:
- Prioritize Box Construction: Always inquire about the cabinet box material. Opt for furniture-grade plywood construction over medium-density fiberboard (MDF) or particleboard, as it offers superior durability, structural integrity, and resistance to moisture damage—a crucial factor in kitchen environments.
- Integrate Ergonomic Storage: Plan your storage with daily workflow in mind. Incorporate at least three to four deep drawers in your lower cabinet layout for easy access to heavy pots and pans. Utilize specialized pull-outs, such as vertical tray dividers for baking sheets and pull-out spice racks near the cooktop, to maximize efficiency.
- Maximize Difficult Corners: Don’t let corner space go to waste. Modern solutions like LeMans pull-out swing trays or “Magic Corner” systems transform these awkward areas into highly accessible and valuable storage zones, far surpassing the utility of a traditional lazy susan.
- Focus on High-Touch Elements: Invest in quality hardware and mechanisms. High-end, soft-close hinges and full-extension drawer glides from reputable brands like Blum not only provide a sense of luxury but also extend the lifespan of your cabinetry by reducing wear and tear.
Choosing the right cabinetry is a foundational step in any high-end kitchen remodel. The selections made here will define the room’s character for decades. To ensure your investment yields both beauty and flawless function, partnering with a design-build expert who understands the nuances of material quality and spatial planning is essential. An experienced professional can guide you through the options, helping you select solutions that perfectly match your lifestyle and aesthetic goals.
4. Choose Countertops and Backsplash Materials
Selecting your countertops and backsplash is a defining moment in the kitchen remodeling checklist, as these surfaces significantly impact both the room’s aesthetic appeal and daily functionality. They are the primary work surfaces and visual focal points, so your choice should balance beauty with performance. This decision bridges the gap between your design vision and the practical demands of a high-traffic kitchen environment.
The material options are vast, with prices reflecting their durability, origin, and maintenance needs. For example, budget-friendly laminate can cost as little as $10-$40 per square foot, while premium natural stones like quartzite or marble command prices of $60 to over $200 per square foot. The backsplash, designed to protect your walls from splatters, offers another layer of personalization, with materials ranging from classic ceramic tile and glass to seamless slab extensions of your countertop material.
Actionable Selection Tips
To choose the perfect surfaces that align with your lifestyle and design goals, consider these expert recommendations:
- Visit Stone Yards in Person: For natural materials like granite or marble, always select your specific slab in person. The veining, color, and character of each piece are unique, and digital photos cannot capture these subtle variations.
- Prioritize Durability for High-Use Areas: Engineered quartz, from leading brands like Caesarstone and Cambria, offers an ideal balance of durability, low maintenance, and consistent appearance, making it a popular choice for busy family kitchens. In contrast, classic Carrara marble offers timeless luxury but requires sealing and careful use to prevent stains and etching.
- Plan for Seating and Function: When designing an island, extend the countertop 12 to 15 inches beyond the base cabinets. This creates a comfortable overhang for bar-style seating, maximizing the island’s utility.
- Mix and Match Materials: Create a custom, high-end look by using different materials strategically. You could install durable, non-porous quartz along the main perimeter for food prep and use a dramatic butcher block or elegant marble for a less-used island accent.
Choosing the right combination of materials is essential for a cohesive and functional design. You can see how these choices come together by viewing examples of a completed kitchen remodel in Huntington Beach, CA, where premium materials are expertly integrated.
5. Select Appliances and Verify Utility Requirements
Selecting appliances is a pivotal step in your kitchen remodel checklist, where aesthetics, functionality, and performance converge. This decision goes far beyond choosing a finish; it dictates the kitchen’s workflow and requires careful verification of your home’s existing utility infrastructure. The right appliance suite enhances your culinary experience and becomes the functional centerpiece of your new space.
The market offers a wide spectrum of choices to suit different budgets and cooking styles. For instance, a reliable appliance package from brands like GE, Whirlpool, or Frigidaire might range from $3,000 to $6,000. In the mid-range tier, brands such as Bosch, KitchenAid, and Samsung offer enhanced features and design for $6,000 to $12,000. For the ultimate in performance and luxury, a suite from Sub-Zero/Wolf, Miele, or Thermador can command an investment of $15,000 to $40,000 or more, delivering professional-grade results for the discerning home chef.
Actionable Appliance Selection Tips
To ensure your chosen appliances fit perfectly in both form and function, follow these expert guidelines:
- Measure with Precision: Meticulously measure appliance cutouts. Pay special attention to refrigerator depth; a counter-depth model (around 24 inches deep) provides a seamless, built-in look compared to a standard-depth unit (30+ inches).
- Verify Utility Capacity: Before purchasing high-power appliances like induction ranges or double wall ovens, have a licensed electrician confirm your electrical panel can support the load. This is a critical step to prevent costly and unexpected electrical upgrades.
- Plan for Connections: If you are switching from an electric to a gas range, the location and installation of a new gas line must be planned with your contractor. Similarly, ensure your ventilation plan is adequate; a powerful range hood should provide approximately 100 CFM for every 10,000 BTUs of your cooktop’s output.
- Confirm Lead Times: High-demand and custom appliances can have significant lead times, sometimes stretching from 8 to 16 weeks. Order them early in the process to avoid delaying your project’s timeline. While stainless steel remains a timeless choice for resale value, panel-ready options offer a fully integrated, custom look.
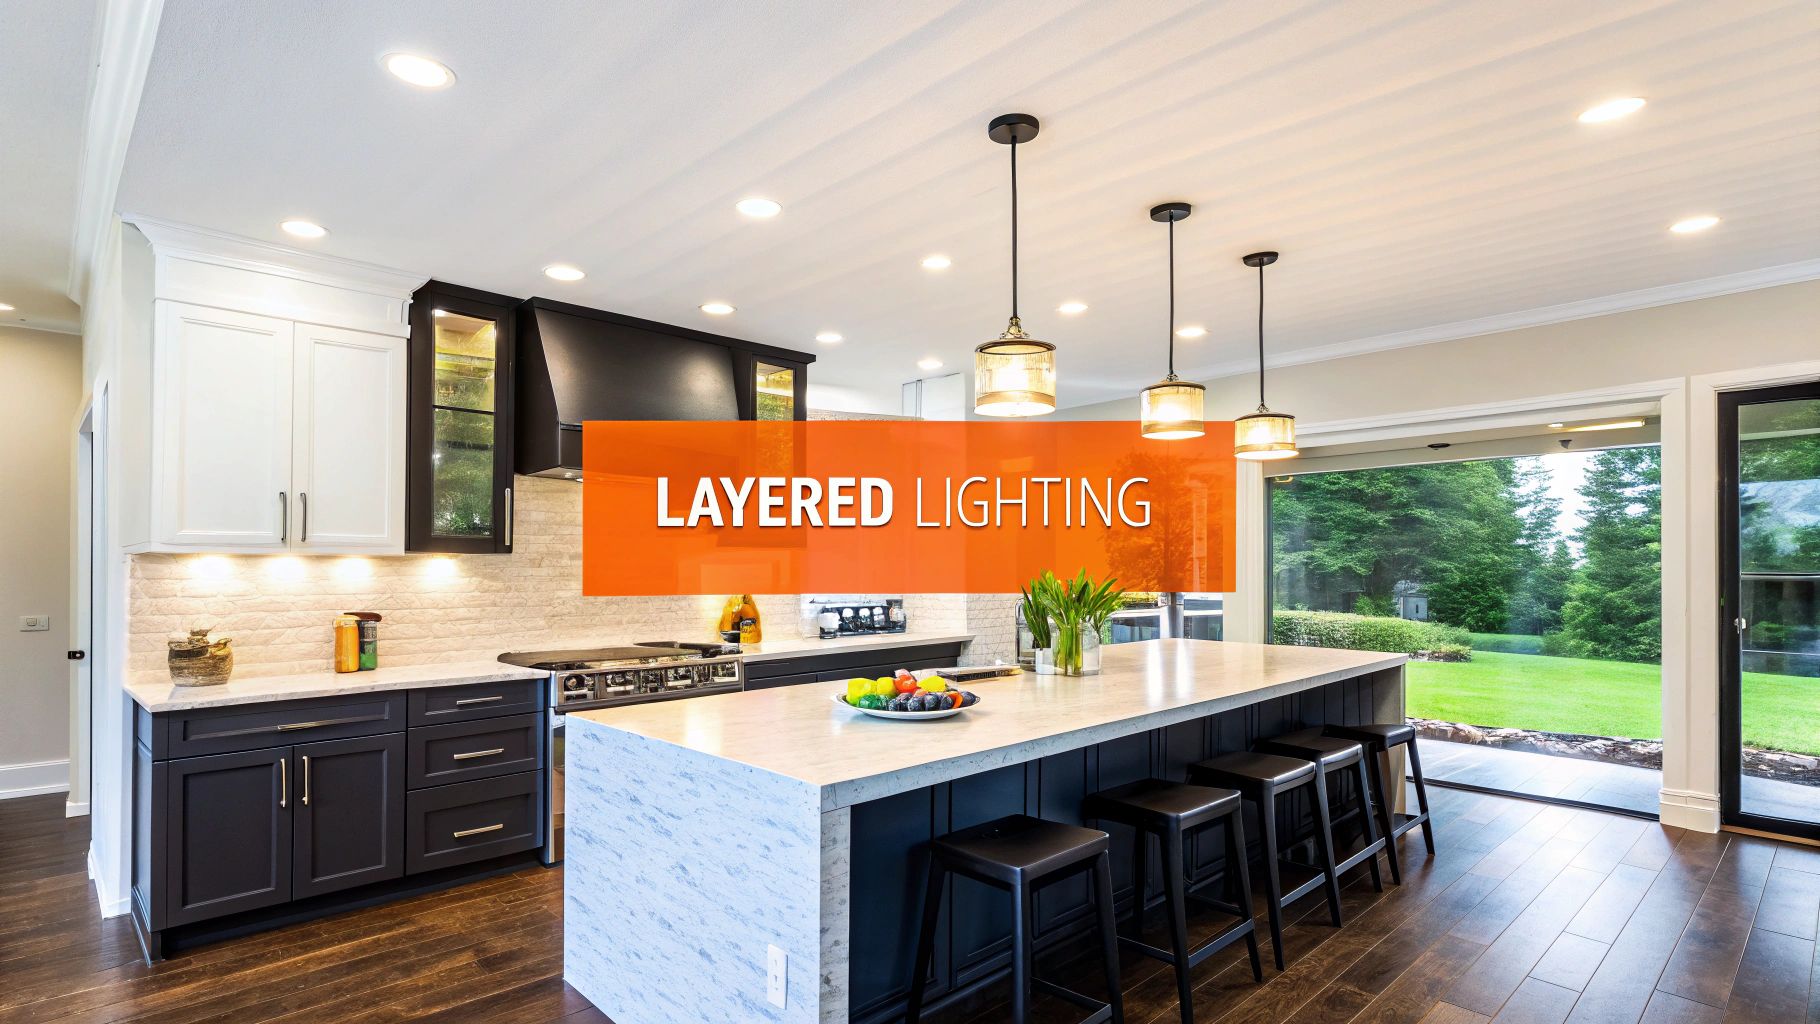
6. Plan Lighting Strategy (Task, Ambient, and Accent)
A sophisticated lighting plan is a non-negotiable part of any high-end kitchen remodel checklist, transforming a functional space into an inviting and luxurious environment. It goes far beyond simply illuminating the room; it involves a layered approach that enhances aesthetics, improves safety, and creates ambiance. A truly effective strategy integrates three distinct types of lighting: ambient for general illumination, task for focused work areas, and accent for highlighting architectural or design features.
This crucial planning stage must happen in coordination with your electrical layout before drywall is installed. The difference between a standard kitchen and a professionally designed one often lies in the quality and placement of its lighting. Brands like Visual Comfort and Restoration Hardware offer the kind of luxury statement fixtures that elevate an island, while specialists such as WAC Lighting provide innovative, low-profile under-cabinet systems essential for task-oriented zones.
Actionable Lighting Tips
To develop a comprehensive and layered lighting scheme, consider these expert recommendations:
- Install Dimmers Everywhere: Fit dimmer switches, such as those from Lutron, on all lighting circuits. This provides ultimate flexibility, allowing you to transition from bright, functional light for cooking to a soft, ambient glow for entertaining.
- Optimize Task Lighting: Under-cabinet lighting is essential for eliminating shadows on countertops. Place these on a dedicated switch for easy access. To ensure food and materials look their best, select high-quality LED bulbs with a Color Rendering Index (CRI) of 90 or higher.
- Position Recessed Lights Strategically: For even ambient light, space recessed cans 4-6 feet apart. Position them approximately 18-24 inches from your upper cabinets to perfectly illuminate the countertop workspace below, preventing you from casting a shadow over your tasks.
- Scale Pendant Fixtures Correctly: When hanging pendants over an island, ensure they are proportionate. A common guideline is to use pendants with a 12-inch diameter for every 30 inches of island width. They should hang 30-36 inches above the countertop for ideal clearance and visual balance.
By layering these three lighting types, you create a dynamic and highly functional kitchen. This meticulous planning is a hallmark of a luxury remodel, ensuring the space is not only beautiful but also perfectly suited to your lifestyle.
7. Coordinate Permits, Contractors, and Project Timeline
With your design finalized and financing secured, your kitchen remodel checklist now moves into the logistical heart of the project: managing the construction phase. This crucial step involves navigating building permits, hiring and coordinating skilled tradespeople, and establishing a detailed project timeline. Proper management here is what transforms a well-designed plan into a tangible, high-quality reality, ensuring the project runs smoothly, on schedule, and up to code.
The complexity of this phase depends on your project’s scope. Any work involving structural changes or modifications to electrical, plumbing, or gas lines will require permits and subsequent inspections from your local building department. The construction timeline itself can vary significantly; a typical mid-range kitchen remodel often takes 6 to 12 weeks from the start of demolition to completion. However, this can extend due to custom orders or unforeseen delays, making a realistic schedule essential.
Actionable Project Management Tips
To effectively manage the moving parts of your kitchen renovation, consider these expert recommendations:
- Vet Your Professionals: Obtain at least three detailed, itemized quotes from licensed and insured general contractors. Verify their license status through your state’s licensing board, check online reviews, and ask for recent references. This due diligence is the foundation of a successful project.
- Establish a Clear Payment Schedule: Your contract should detail a payment schedule tied to specific, verifiable milestones (e.g., completion of demolition, successful rough-in inspection, cabinet installation). Never pay more than a 10-15% deposit, as required by law in many areas.
- Plan for Disruption: Set up a temporary kitchen in another area of your home, like the dining room or basement, equipped with a microwave, a hot plate, and a cooler. This preparation significantly reduces the daily stress of living through a major renovation.
- Maintain Open Communication: Schedule regular check-ins with your contractor and document all important conversations and change orders in writing. For older homes, it is crucial to coordinate with your contractors regarding the proper disposal of hazardous materials like asbestos if encountered during demolition.
- Build in a Buffer: Experienced professionals know that delays are common. Add a two to three-week buffer to your timeline to account for potential material backorders, subcontractor scheduling conflicts, or unexpected issues.
A streamlined approach that integrates planning, permitting, and construction management under one roof can prevent many common headaches. To see how a unified process simplifies complex renovations, you can explore professional design-build services.
8. Select Flooring, Fixtures, and Finishing Details
With the foundational elements of your kitchen design established, the next crucial phase in your kitchen remodel checklist is selecting the materials that bring your aesthetic vision to life. The flooring, fixtures, and finishing details are the tactile and visual components you will interact with daily. These choices significantly impact the room’s durability, functionality, and overall personality, transforming it from a basic layout into a bespoke space.
The selection process involves balancing aesthetics, performance, and budget across several key categories. Flooring must withstand constant foot traffic, spills, and dropped items, making material choice critical. Fixtures like sinks and faucets are the workhorses of the kitchen, while hardware and molding provide the final layer of polish. For example, a modern kitchen might pair large-format porcelain tile with a sleek, undermount stainless steel sink and matte black hardware. In contrast, a classic farmhouse look could feature wide-plank engineered hardwood, a white fireclay apron-front sink, and brushed nickel cup pulls.
Actionable Selection Tips
To choose the right combination of finishes that align with your lifestyle and design goals, consider these expert recommendations:
- Prioritize a Durable Foundation: For flooring, opt for waterproof materials like luxury vinyl plank (LVP) or porcelain tile, especially in high-moisture areas around the sink and dishwasher. Brands like Coretec and Lifeproof offer highly realistic wood-look LVP that combines beauty with superior resilience.
- Coordinate Metal Finishes: Create a cohesive look by limiting your metal finishes to two or, at most, three. A popular strategy is to use one primary finish, such as brushed nickel for the faucet and appliances, and an accent finish, like matte black for cabinet hardware and light fixtures.
- Focus on Sink Functionality: While aesthetics are important, prioritize how you use your sink. A large, single-bowl undermount sink, often favored by brands like Kohler and Blanco, is highly practical for washing large pots and pans and creates a seamless, easy-to-clean counter transition.
- Balance Hardware Ergonomics: Consider both form and function for cabinet hardware. Pull handles are generally more ergonomic and easier to use on heavy drawers, while knobs work well for upper cabinet doors. Top Knobs and Emtek offer extensive collections to suit any style.
The following chart illustrates the most popular material choices for key kitchen finishes, reflecting current trends that emphasize durability and timeless appeal.
This data shows a clear preference for materials that offer longevity and sophisticated style. Choosing the right flooring is particularly impactful, as it sets the stage for the entire room. For professional guidance on material selection and installation, explore expert insights on flooring sales and installation.
Kitchen Remodel Checklist: 8 Key Factors Comparison
| Item | Implementation Complexity 🔄 | Resource Requirements ⚡ | Expected Outcomes 📊 | Ideal Use Cases 💡 | Key Advantages ⭐ |
|---|---|---|---|---|---|
| Create a Realistic Budget and Financing Plan | Moderate – requires detailed cost analysis and quotes | Financial planning tools, contractor quotes | Controlled spending, realistic timelines, ROI focus | All remodels needing financial control | Prevents overspending, prioritizes needs, aids negotiations |
| Design Layout and Optimize Workflow (Kitchen Triangle) | High – involves spatial planning and possible structural changes | Design software, possibly contractors, permits | Efficient workflow, safety, increased home value | Functional kitchen redesign, multi-cook households | Maximizes efficiency, improves safety, facilitates social interaction |
| Select Cabinetry Style and Storage Solutions | Moderate to High – selection and professional installation | Budget for cabinetry, design consultation | Durable, functional storage, visual style impact | Budget to luxury remodels emphasizing storage | Long-lasting quality, enhances aesthetics, improves organization |
| Choose Countertops and Backsplash Materials | Moderate – material selection plus professional templating and installation | Material cost varies widely, fabrication services | Durable surfaces, significant aesthetic impact | Remodels focusing on visual appeal and durability | Wide price range, improves resale, protects walls |
| Select Appliances and Verify Utility Requirements | Moderate to High – appliance selection and utility verification | Major appliance budget, electrician/plumber | Improved cooking efficiency, energy savings | Remodels upgrading appliances or switching fuel types | Energy-efficient models, enhanced functionality, warranty coverage |
| Plan Lighting Strategy (Task, Ambient, and Accent) | Moderate – requires early electrical planning and fixture selection | Lighting fixtures, dimmers, electrician | Improved visibility, ambiance, energy savings | Remodels emphasizing functionality and style | Enhances safety, layered lighting aesthetics, reduces energy use |
| Coordinate Permits, Contractors, and Project Timeline | High – administrative and project management intensive | Permit fees, contractor fees, time investment | Code compliance, smooth workflow, fewer disputes | All remodels involving structural/electrical work | Ensures safety, professional oversight, reduces risks |
| Select Flooring, Fixtures, and Finishing Details | Moderate – selection of materials and hardware, professional install | Variety of flooring and fixtures budgets | Durable surfaces, cohesive design | Final finish phase of remodel emphasizing durability | Long-lasting materials, modernizes kitchen, elevates design |
Partner with Orange County’s Premier Remodeling Experts
Navigating a kitchen renovation can feel like orchestrating a complex symphony of design, logistics, and skilled labor. This comprehensive checklist for remodeling kitchen projects provides the essential sheet music, guiding you from the initial notes of budgeting and financing to the final crescendo of a walkthrough. By now, you understand that success lies in the details: optimizing the workflow of your kitchen triangle, harmonizing cabinetry with countertops, and layering task, ambient, and accent lighting for both function and drama.
The journey from a conceptual dream to a tangible, high-end kitchen is built on a foundation of deliberate choices. We’ve highlighted the importance of selecting appliances that fit not just your culinary style but also your home’s existing utility infrastructure. We also emphasized the critical, often overlooked, steps of coordinating permits and managing a realistic project timeline to avoid costly delays and unnecessary stress. Each item on this checklist, from flooring to fixtures, is a vital component of a cohesive and value-enhancing final product.
The Value of a Masterfully Executed Plan
Mastering these concepts transforms a kitchen remodel from a daunting undertaking into a strategic investment in your home’s value and your family’s quality of life. An impeccably planned renovation, executed with precision, does more than just update aesthetics; it enhances daily living, streamlines household activities, and creates a welcoming hub for connection and entertaining. For discerning homeowners in Orange County, a project of this magnitude demands more than just a plan. It requires a partner dedicated to white-glove service and unparalleled craftsmanship.
The true power of this checklist is unlocked when it is wielded by a team that can anticipate challenges, source premium materials, and manage every intricate detail with flawless execution. A seamless process, transparent communication, and a commitment to excellence are not luxuries; they are necessities for achieving a result that meets the highest standards. Your home is your sanctuary, and its transformation should be an experience marked by confidence and peace of mind, not chaos and compromise.
From Checklist to Completed Masterpiece
Ultimately, this guide serves as your blueprint for success. It empowers you to ask the right questions, make informed decisions, and approach your project with the clarity and confidence of an expert. The most significant takeaway is that a successful kitchen remodel is the direct result of pairing a meticulous plan with an elite-level team. Your vision for a custom, high-performance kitchen deserves an execution partner who operates at the same high standard.
By internalizing the principles within this guide, you are already one step closer to creating a space that is not only beautiful but also a perfect reflection of your lifestyle. The final step is to transition from planning to action. With this roadmap in hand, you are now perfectly positioned to engage a professional who can bring your meticulously planned vision to life with the integrity and expertise it warrants, turning your dream kitchen into an enduring reality.
Ready to transform your kitchen with an award-winning team dedicated to impeccable craftsmanship and a stress-free experience? Contact Sparkle Restoration Services for a complimentary design consultation and let our licensed, IICRC Master Certified experts turn your detailed checklist into a stunning reality. Discover the peace of mind that comes from working with Orange County’s premier design-build professionals at Sparkle Restoration Services.
Ready to create a space that’s as beautiful as it is functional? Schedule your complimentary design consultation today by visiting Ready to Work with Sparkle?