

When your Orange County home or business is hit with water damage, the clock starts ticking immediately. Preventing mold after water damage is a battle won or lost in the first 48 hours. This isn't an exaggeration—it's the critical window that determines whether you're dealing with a straightforward water issue or a much more serious, expensive mold problem that can impact your property's value and your family's health.
As an IICRC Master Certified firm serving Southern California for decades, we’ve seen firsthand that the most effective way to protect your property is to take swift, decisive action to achieve a scientifically proven dry standard.
The 48-Hour Window for Mold Prevention
After a pipe bursts or a dishwasher overflows, it’s easy to feel overwhelmed. Your first instinct is to focus on the standing water you can see, but the real enemy is the moisture you can't see. Mold spores are a natural part of our environment, always present and waiting for one thing: moisture. Once materials like drywall, carpet padding, or the wood framing inside your walls get wet, they become the perfect breeding ground.
Here’s the hard truth: Mold can begin to colonize on damp surfaces within 24 to 48 hours. That’s your window. This isn't just a guideline; it's a scientific fact we observe in the field time and time again. By the time you smell that musty odor, mold has already taken hold, often hidden from view behind walls or under flooring. A "wait and see" approach is the single biggest mistake a property owner can make.
Your Initial Action Plan
Navigating the first few hours is about staying calm and taking methodical steps to stop the damage from spreading. Don't try to fix everything at once. The goal is to regain control and mitigate the immediate threat.
Here are the essential first moves for any property owner facing a water emergency:
- Safety First, Always. Before you even think about cleanup, secure the area. If there's standing water, turn off the power at the breaker box to eliminate the risk of electrocution. Be cautious of slippery floors and recognize that water-logged ceilings can become unstable and collapse.
- Stop the Water at its Source. This is priority number one. Find your main water shut-off valve and turn it off. If a specific appliance is the culprit, it should have its own supply valve. If the water is coming from outside, like during a storm, do what you can to block its entry with sandbags or tarps.
- Start Removing Water Immediately. Once it’s safe, begin removing as much standing water as possible. Use mops, old towels, buckets, or a wet/dry shop vac. Every gallon of water you remove manually is one less gallon that has to be evaporated by professional-grade fans and dehumidifiers.
Expert Insight: I can't count the number of times I've seen a small leak in a Newport Beach bathroom turn into a catastrophic failure downstairs. Water is relentless. It will exploit the tiniest cracks in the subfloor, travel down the inside of walls, and pool on top of the ceiling below. What appears as a small puddle is often just the tip of the iceberg.
Acting fast in these first hours is everything. As you work, be sure to take extensive photos and videos for your insurance claim. These initial steps are vital, but they’re just the beginning of a proper restoration process.
Immediate Action Checklist After Water Damage
Follow these essential steps within the first 24 hours to significantly reduce the risk of mold growth and mitigate further damage to your property.
| Priority Action | Why It's Critical | Sparkle's Pro Tip |
|---|---|---|
| Shut Off Power | Eliminates the risk of electrical shock from submerged outlets or appliances. | If you're unsure which breaker controls the affected area, it's safest to turn off the main breaker to the entire property. |
| Stop the Water Source | Prevents more water from entering and worsening the damage. | Know where your main water shut-off valve is before an emergency. Label it clearly with a bright tag. |
| Remove Standing Water | Reduces the overall moisture load, accelerating the drying process and preventing saturation of subfloors. | A wet/dry shop vacuum is your best tool for this. It's far more effective than just mopping and using towels. |
| Document Everything | Provides crucial evidence for your insurance claim, proving the extent of the initial damage. | Take video! Walk through the affected areas, narrating what you see. Open cabinets and closets to show hidden damage. |
| Move Wet Items | Gets furniture, rugs, and personal belongings out of the water to prevent them from being ruined and to allow airflow. | Place small squares of aluminum foil or wood blocks under furniture legs to prevent staining on carpets and flooring. |
| Increase Air Circulation | Helps begin the evaporation process, even before professional equipment arrives. | Open windows (if humidity outside is lower) and use any household fans you have to get the air moving. |
Taking these immediate steps turns chaos into a manageable situation. Being prepared ahead of time can make all the difference—a pre-stocked kit lets you respond faster and more effectively. Check out our guide on creating a water emergency first aid kit to see what you should have on hand.
The Science of Drying and Dehumidification
Once the standing water is gone, many property owners breathe a sigh of relief, thinking the worst is over. In my experience as a restoration professional, this is rarely the case. Proper drying is a science, and simply aiming a couple of household fans at a damp spot is a recipe for disaster. This common mistake often leads to much bigger headaches, like hidden mold that thrives undetected inside your walls.
Truly preventing mold after water damage means eliminating not only the visible water but also the invisible moisture that has soaked deep into your home’s structural materials.
As IICRC-certified professionals, we don't guess—we measure. The entire goal is to establish a controlled drying environment. We carefully balance temperature, airflow, and humidity to aggressively pull moisture from materials like drywall, wood framing, and subfloors. This isn't just about powerful equipment; it's about understanding psychrometry—the science of how air and moisture interact—to restore your property safely and completely.
Creating the Optimal Drying Environment
A professional dry-out is a strategic process. We use high-velocity air movers, but their placement is what truly matters. They're positioned to create a powerful vortex of air that flows across all wet surfaces, accelerating evaporation and lifting moisture out of the materials and into the air.
But now you have a new challenge: all that moisture is suspended in the air, ready to be reabsorbed by dry materials. This is where commercial-grade dehumidifiers are essential. These are not your typical home units; they are powerful machines designed to aggressively pull moisture from the air, collect it, and drain it away permanently.
This combination of intense air movement and powerful dehumidification creates a dry, "thirsty" atmosphere that continuously draws moisture from the building itself until every material returns to its normal equilibrium moisture content. For the best long-term results, especially in areas like basements, having the right equipment makes all the difference. You can find some of the best dehumidifiers for basements to keep these spaces dry year-round.
Hitting the Target Humidity Level
The goal here is non-negotiable: restore the proper indoor relative humidity. The science is crystal clear on this. To stop mold in its tracks, indoor humidity must be brought down to the 30-50% range, and the entire drying process needs to be completed within 24 to 48 hours whenever possible. Waiting longer is a direct invitation for mold to grow.
This simple, three-step plan shows the immediate priorities after finding water damage, which sets the stage for the scientific drying process to begin.
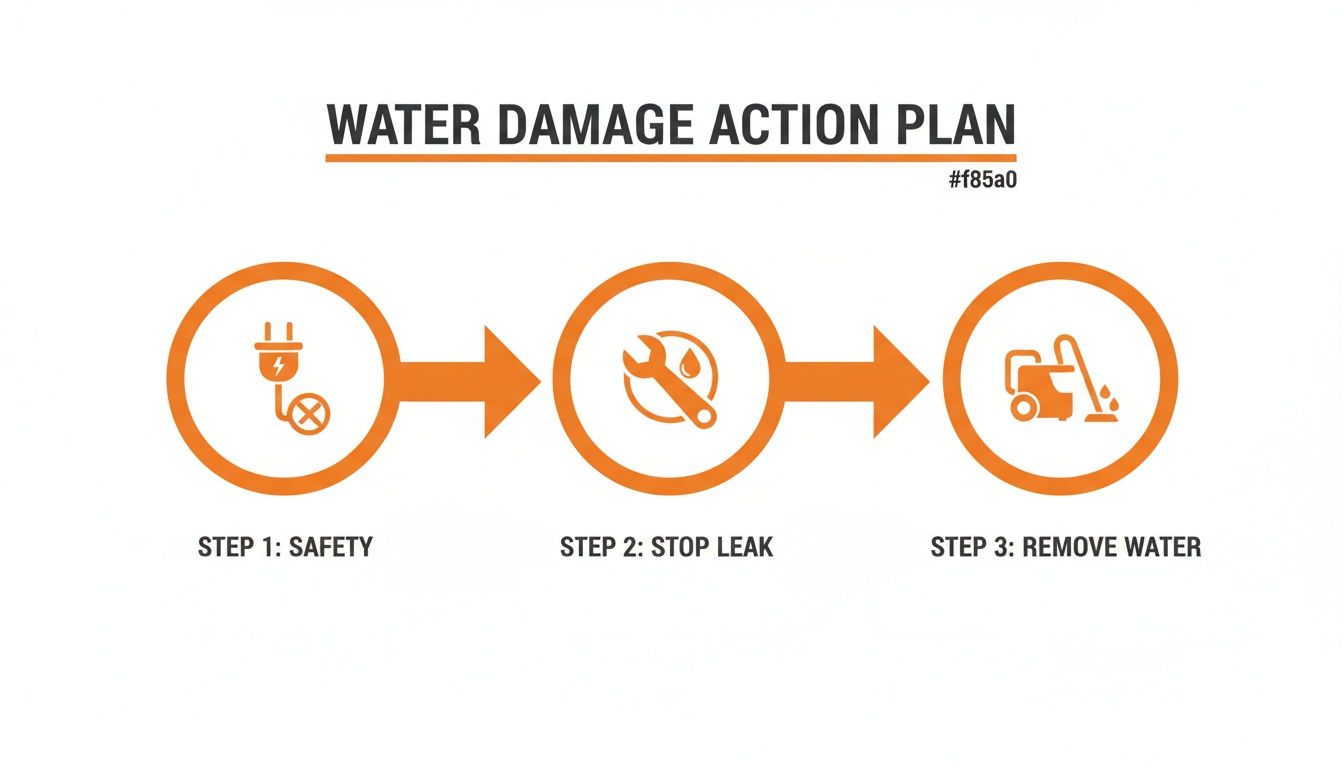
Tackling these first steps safely and quickly is critical before a professional team can begin the scientific work of drying out your home.
A Real-World Irvine Scenario
Not long ago, we received an emergency call to a home in Irvine where a supply line to an upstairs laundry room had burst. The homeowners did an excellent job sopping up all the standing water and assumed a few fans would handle the rest. Two days later, they called us because the ceiling downstairs began to show discoloration.
When we arrived, our moisture meters told a completely different story.
Even though the upstairs carpet felt dry to the touch, the subfloor underneath was still completely saturated. Worse, the moisture readings for the ceiling joists below were dangerously high. Water had been slowly seeping downward, turning the space inside their ceiling into a perfect petri dish for mold.
Sparkle Restoration Pro Tip: Never trust your hands to determine if something is dry. Wood and drywall can hold significant moisture without feeling damp. Professional moisture meters are the only way to know for sure that a material is back to its "dry standard"—a baseline we establish and monitor to confirm it's truly dry.
We immediately set up a containment barrier and installed a professional drying system. This involved removing baseboards to direct high-velocity airflow into the wall cavities and strategically placing our dehumidifiers to manage the air's moisture load. Within three days, our meters confirmed all affected materials were back to their normal moisture levels. Had they waited just another day or two, they would have been facing a far more expensive and invasive mold remediation project.
If you're interested in the technical side of things, we cover more about how water damage is scientifically categorized and addressed in another one of our articles.
Deciding What To Keep And What To Discard
Sorting through your belongings after water damage is emotionally and physically taxing. However, having a clear strategy, one based on years of professional experience, helps you make confident, safe decisions. The entire process comes down to understanding how different materials react to water.
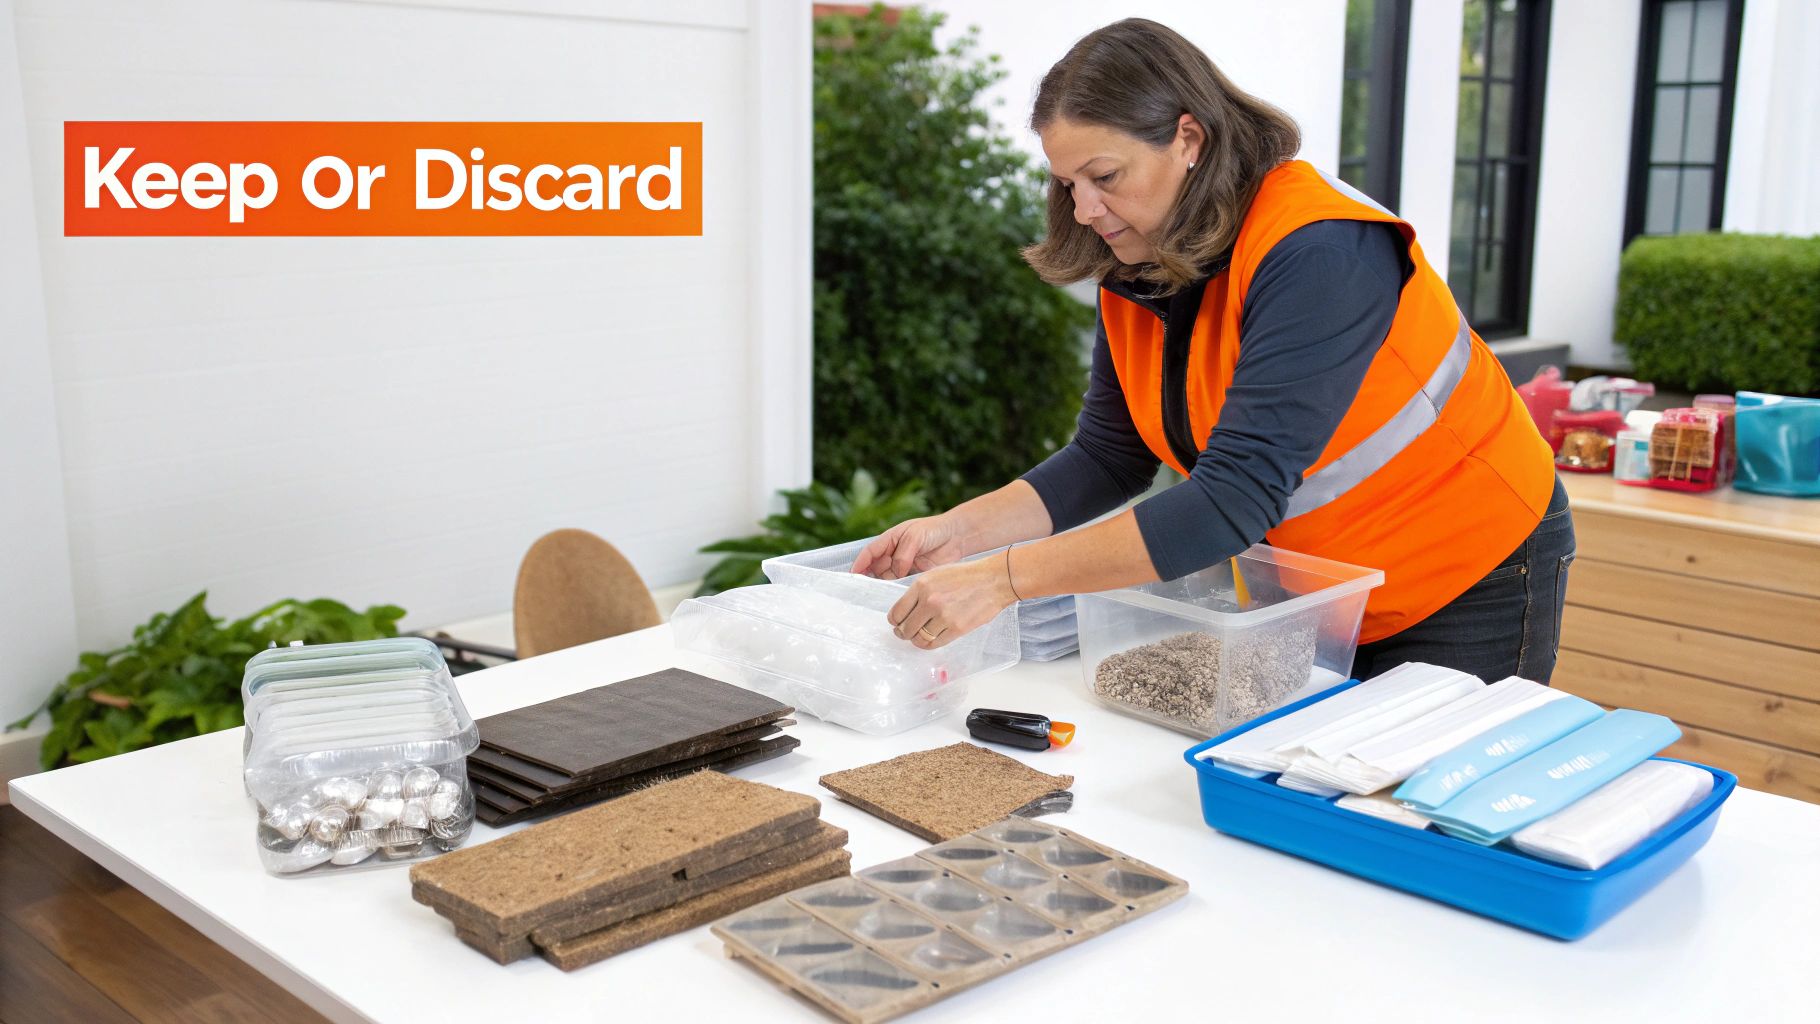
Knowing what’s safe to keep is critical for preventing mold after water damage. If you salvage the wrong items, you risk reintroducing moisture and hidden mold spores right back into your clean, restored home—a costly and unhealthy mistake.
To make this easier, we break materials down into three key categories.
Water Damage Salvage Guide Porous vs Non-Porous Items
When you're faced with a pile of wet belongings, it can be overwhelming to decide what's salvageable. This quick guide breaks down common household items by their material type to help you make smart, safe choices about what to keep and what to toss.
| Material Type | Examples | Salvage Potential | Professional Recommendation |
|---|---|---|---|
| Non-Porous | Glass, metal, hard plastics, glazed ceramics | Excellent | Clean thoroughly with soap and water, then sanitize. Dry completely before returning to the restored area. |
| Semi-Porous | Solid hardwood flooring, sealed concrete, vinyl | Good (Time-Sensitive) | Must be addressed quickly. Professional drying techniques are often needed to prevent warping and extract deep moisture. |
| Porous | Drywall, insulation, carpet & padding, mattresses, particle board furniture | Very Low to None | Discard immediately. These items act like sponges and are nearly impossible to dry completely, making them a high risk for mold. |
Ultimately, this table is your cheat sheet. When in doubt, erring on the side of caution is always the best move to protect your home and health.
Non-Porous and Semi-Porous Materials
Let's start with the easy wins: non-porous materials. Because they don't absorb water, cleaning and disinfecting them is straightforward. Think glass, metal, hard plastics, and glazed tile. Unless an item is physically broken, it can almost always be saved. Simply clean and sanitize it thoroughly, ensuring it's completely dry before bringing it back into the restored space.
Semi-porous materials are trickier. This category includes items like solid hardwood and sealed concrete. They can absorb some water, but if addressed quickly, they often have a good chance of being salvaged. The key here is speed. The longer they remain wet, the more likely they are to warp, swell, or develop mold deep within. This is where professional equipment, like specialized floor drying mats that pull moisture directly out of hardwood, makes a critical difference.
While sorting, remember that meticulous documentation is your best friend when it comes to insurance. Taking the time for creating a detailed home inventory for insurance can be a lifesaver, providing a clear record of your losses.
The Challenge of Porous Materials
This is where you’ll face the most difficult decisions. Porous materials are the real troublemakers. They act like sponges, soaking up water and trapping it deep within their fibers. Trying to dry them completely is incredibly difficult, and they pose the greatest risk for hidden mold growth.
As IICRC Master Certified professionals, we often advise our Orange County clients that attempting to save heavily saturated porous items is a gamble not worth taking. The cost of future mold remediation almost always outweighs the replacement cost of the item itself.
Here’s a rundown of common porous items that, in most cases, must be discarded after significant water exposure:
- Carpet and Padding: The pad is a massive sponge. It almost never dries out fully and becomes a perfect incubator for mold, which can quickly spread to the carpet and the subfloor below.
- Drywall and Insulation: Wet drywall loses its structural integrity and crumbles. Wet insulation becomes useless. Worse, they trap moisture inside wall cavities, creating a hidden mold factory.
- Upholstered Furniture and Mattresses: With their multiple layers of fabric, foam, and batting, they are practically impossible to dry and disinfect completely.
- Particle Board Furniture: This material swells and disintegrates when wet, losing all structural integrity and becoming a serious mold hazard.
Navigating these decisions means separating fact from fiction. To help, we've put together a resource that busts some common facts and myths about mold and mold remediation. Our goal is always to provide honest, expert advice that protects your property and your family’s health.
Why Professional Expertise Is a Smart Investment
Attempting to clean up water damage yourself can feel like a smart way to save money. But in our extensive experience, it almost always becomes a much more expensive mistake down the road.
The hard truth is that water damage is rarely a simple, surface-level problem. Without professional-grade equipment and certified training, it's virtually impossible for a homeowner to locate and eliminate all hidden moisture. This sets the stage for a silent, destructive mold problem to take root.
This is where calling in a professional shifts from being a "service" to being a critical investment in your property's health and future value. An incomplete cleanup doesn't just leave a damp spot; it creates the perfect breeding ground for mold behind your walls, under your floorboards, and deep within your insulation.
When it comes to preventing mold after water damage, there is simply no substitute for the precision and scientific approach of a certified team.
The Unseen Dangers of DIY Cleanup
The biggest risk with a DIY approach is what you can't see. A few household fans are no match for the deep, trapped moisture that wicks into porous materials like drywall and wood studs. That lingering dampness is precisely what dormant mold spores are waiting for.
What begins as a small water issue can escalate quickly. The global mold remediation market was valued at approximately USD 1.23 billion in 2023 and is projected to climb as extreme weather and aging infrastructure lead to more water damage events. This isn't just a number—it's a clear indicator of a widespread problem where initial water damage isn't handled correctly, leading to far costlier secondary issues.
In fact, a major European study found that roughly 16.5% of homes had combined issues with dampness, mold, or water damage, highlighting just how common these problems are. You can read more about the global impact of indoor moisture on our health to see the bigger picture.
At Sparkle Restoration, we’ve seen countless situations where a homeowner thought they had the problem handled, only for us to discover extensive mold growth months later. A professional isn't just there to dry things out; we're there to guarantee the problem is solved completely, protecting your family and your investment.
The IICRC-Certified Professional Process
When you hire an IICRC Master Certified firm like Sparkle Restoration, you're bringing in experts who adhere to a strict, scientifically proven protocol. We don't guess. We follow a methodical strategy to ensure every last bit of moisture is eliminated and to stop future growth in its tracks.
Here’s a look at what a professional response actually involves:
Establishing Containment: First, we isolate the affected area. Using heavy-duty plastic sheeting, we create a containment barrier. This is critical for preventing any existing mold spores from spreading to unaffected parts of your home during our work.
Creating Negative Air Pressure: Inside the contained space, we set up specialized equipment called negative air machines, or "air scrubbers." These powerful units are fitted with HEPA filters and vented outside your home. This creates a vacuum effect, ensuring any airborne contaminants (like microscopic mold spores) are captured and removed from the air before they can escape.
Using HEPA Filtration: High-Efficiency Particulate Air (HEPA) filters are the industry gold standard, designed to capture 99.97% of particles as small as 0.3 microns. We use HEPA-filtered vacuums on all surfaces and run air scrubbers continuously to purify the air, trapping spores that are invisible to the naked eye.
Post-Remediation Verification: Our job isn't done just because things look and feel dry. We conduct thorough testing to confirm the area has been returned to a normal, safe fungal ecology. This often involves taking air and surface samples that are sent to an independent, third-party lab for analysis, providing you with verifiable proof that your home is safe.
Choosing a company with credentials like the BBB Torch Award for Ethics ensures you’re working with a team committed to transparency and the highest standards of service. Our comprehensive approach to professional mold remediation services offers Orange County property owners true peace of mind, turning a chaotic situation into a calm, controlled, and complete recovery.
Building a Mold-Resistant Home for the Long Term
Once the immediate crisis of water damage is under control, your focus can shift from reaction to prevention. Preventing mold after water damage isn't just about the cleanup—it's about building a more resilient, healthier home for the future. This is where we see a one-time crisis become an opportunity for a long-term wellness solution for your property.
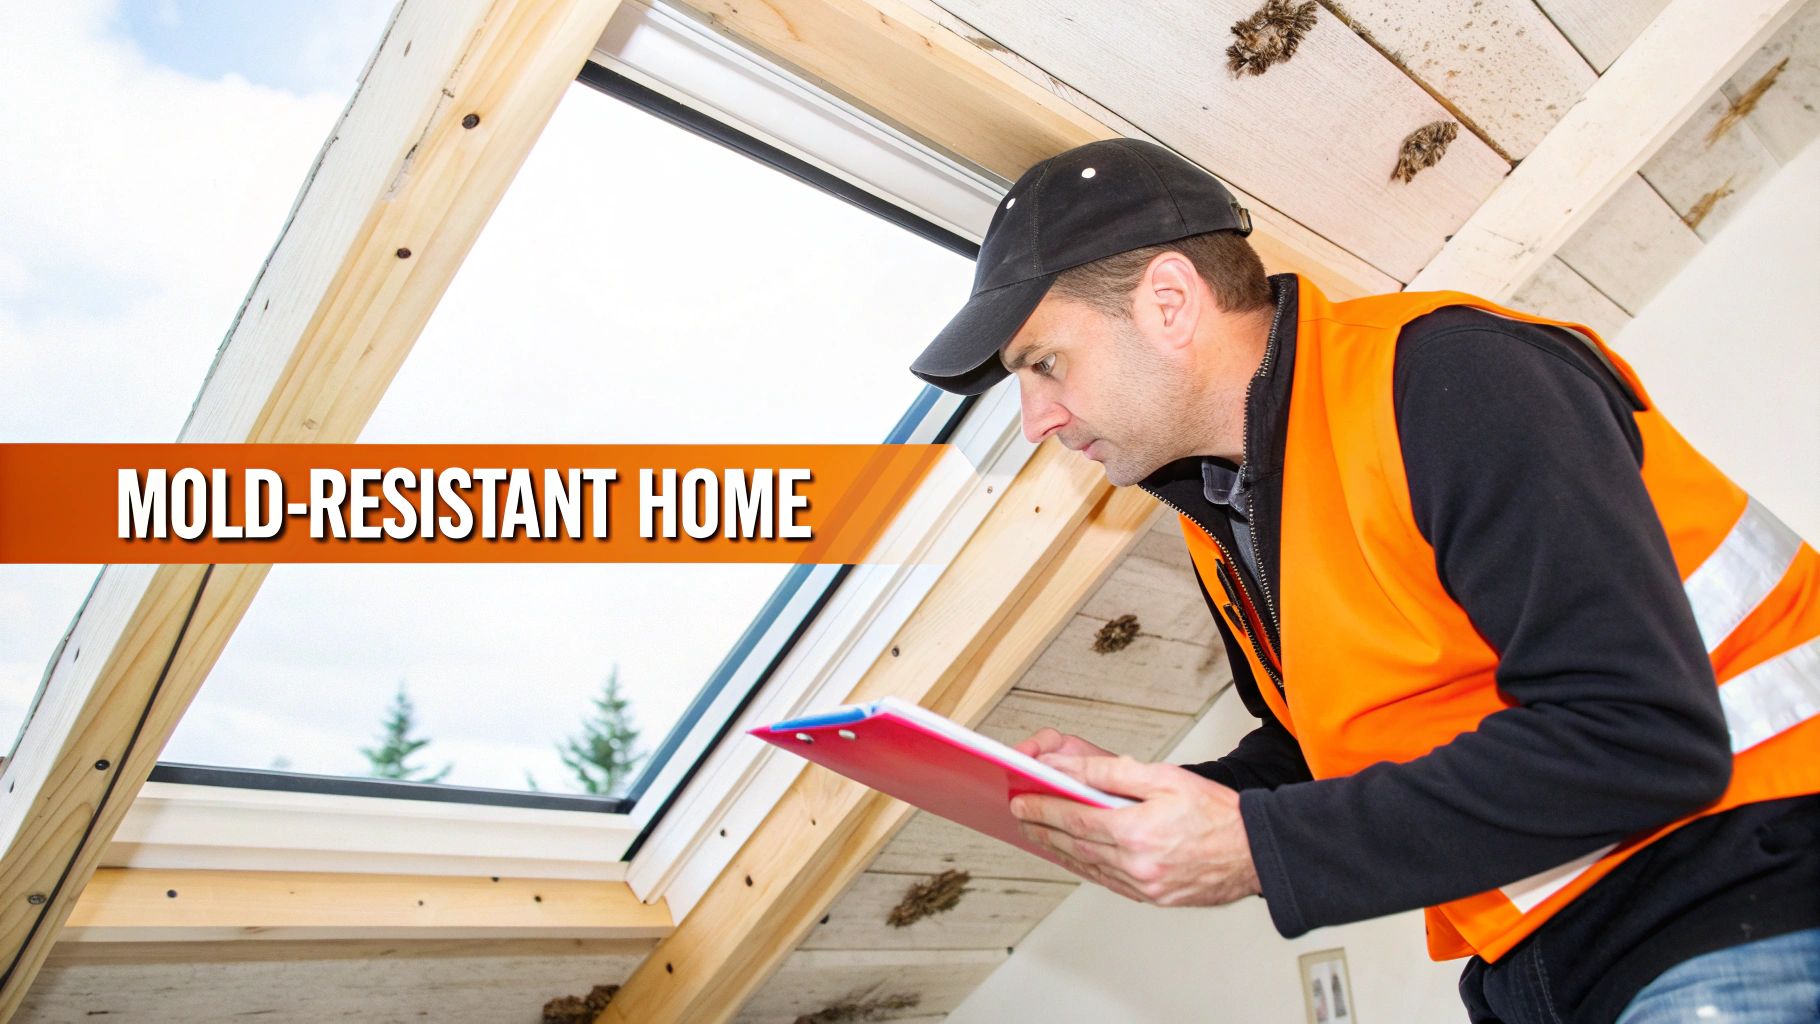
This proactive mindset is where our dual expertise as an IICRC Master Certified restoration expert and a Licensed General Contractor truly shines. We don't just patch the problem; we help you fortify your home so it's better prepared for whatever comes next.
Proactive Home Maintenance Routines
The absolute best way to prevent catastrophic water damage is to catch small issues before they become major disasters. A simple, consistent maintenance routine can genuinely save you thousands of dollars and immense stress.
Here are a few high-impact habits we recommend for every Southern California homeowner:
- Appliance Hose Checks: Regularly inspect the hoses on your washing machine, dishwasher, and refrigerator ice maker. These are notorious failure points. Look for any bulging, cracking, or drips, and plan to replace them every few years, even if they appear fine.
- Drainage and Foundation Patrol: After a rain, walk around your property. Ensure the ground slopes away from your foundation. Check that your downspouts discharge water at least six feet away from the house. Clogged gutters and poor drainage are a leading cause of water intrusion into basements and crawl spaces.
- Ventilation Verification: Good airflow is your home's secret weapon against moisture. Make sure your attic and crawl space vents are clear of insulation, leaves, or other debris. In bathrooms, always run the exhaust fan during a shower and for about 20 minutes afterward to exhaust humid air outside.
Making these small checks part of your seasonal routine drastically lowers your risk. For a deeper dive, check out our guide to see if your home is leak-proof and spot other hidden vulnerabilities.
Upgrading with Mold-Resistant Materials
When it's time to renovate—whether as part of the water damage repair or a planned remodel—choosing the right materials adds a powerful layer of defense. Modern building science has produced fantastic alternatives to traditional materials that deny mold a place to grow.
Expert Insight: At Sparkle, we see every remodel as an opportunity to improve a home's overall health and resilience. Selecting superior materials from the start is one of the most cost-effective ways to protect your investment and ensure better indoor air quality for your family.
Consider incorporating these materials into your next project:
- Mold-Resistant Drywall: Often called "green board" or "purple board," this product has a paperless backing or is treated with antimicrobials that inhibit mold growth. It's a smart upgrade for bathrooms, kitchens, laundry rooms, and basements.
- Closed-Cell Spray Foam Insulation: Unlike traditional fiberglass insulation that can absorb and hold water like a sponge, closed-cell spray foam is impermeable to water. It creates an airtight seal that functions as both an insulator and a vapor barrier, making it incredibly effective at preventing condensation within wall cavities.
- Luxury Vinyl Tile (LVT) and Porcelain: For flooring in moisture-prone areas, you can't beat materials like LVT and porcelain tile. They are 100% waterproof, easy to clean, and available in a vast range of high-end designs that mimic natural wood or stone without any of the moisture risks.
By combining diligent maintenance with smart material upgrades, you shift from simply fixing damage to actively fortifying your home. It’s an approach that demonstrates a true commitment to quality, health, and lasting peace of mind.
Got Questions About Mold and Water Damage? We Have Answers.
When your property is underwater, questions start flooding in. As Orange County’s trusted restoration experts since 2002, we’ve heard and answered them all. We’ve compiled some straightforward, no-nonsense answers to the most common concerns we hear from homeowners just like you.
This isn’t generic advice—it’s the kind of expert clarity you need to make smart, confident decisions when things feel chaotic.
Can I Just Use Bleach to Kill the Mold?
This is easily one of the most persistent myths in restoration. While reaching for bleach is a common impulse, for porous materials like drywall, wood, or carpet, it’s often an ineffective—and sometimes counterproductive—solution.
Here’s why: Bleach’s chemical structure prevents it from penetrating deep into these materials to eliminate the mold's root system (hyphae). The water component of the bleach solution, however, does soak in, which can actually feed those roots and encourage the mold to return. Bleach may remove the surface color, making you think the problem is solved, but it won't neutralize the allergenic proteins in the remaining mold spores.
Our Professional Takeaway: Proper mold remediation is not a DIY job for household cleaners. It requires EPA-registered antimicrobial treatments. These professional-grade solutions are formulated to penetrate surfaces and kill mold at the source without adding excess moisture, ensuring it's eliminated for good.
How Do I Know If Mold Is Growing Behind My Walls?
Hidden mold is a major concern after any water event, and for good reason. It can silently compromise your home’s structure while negatively impacting your family’s health.
The number one sign is a persistent musty, earthy smell that you can't seem to locate. Other tell-tale signs often include:
- Visual Clues: Look for unusual discoloration, staining, or bubbling/peeling paint on drywall, even if the wall feels dry.
- Structural Changes: Have you noticed any warping or buckling in your walls, baseboards, or flooring? That's a red flag for hidden moisture.
- Health Symptoms: Are allergy-like symptoms (sneezing, coughing, itchy eyes) suddenly worse in a specific area of the house?
If you notice any of these signs, resist the urge to start demolishing drywall yourself. Tearing into a contaminated wall can release a massive cloud of spores into the air, cross-contaminating other areas of your home. A certified professional will use non-invasive tools like thermal imaging cameras and moisture meters to safely identify the source of the problem.
How Long Does Professional Drying Actually Take?
Every situation is unique, so the timeline for a professional dry-out depends on several factors—the amount of water, the types of materials affected, and even the ambient humidity.
That said, a typical residential water damage project usually takes 3 to 5 days to complete the drying phase. This involves our team strategically placing commercial-grade air movers and dehumidifiers. We don't just "set it and forget it." Our IICRC-certified technicians are on-site daily, using calibrated moisture meters to monitor the progress of every affected material until it returns to its established "dry standard."
Rushing this critical process is a recipe for secondary mold growth. Our focus is always on being thorough and scientific, so you have documented proof that your home is truly dry and safe.
Will My Homeowners Insurance Cover Mold Damage?
This is where things can become complex. Mold coverage in a standard homeowner's policy is nuanced, and whether you're covered often hinges on the original cause of the water damage.
Generally, if the mold is a direct result of a "sudden and accidental" covered peril (like a burst pipe), you may have some coverage—often with a specific limit, such as $5,000 or $10,000. However, mold resulting from long-term issues like a slow leak, poor maintenance, high humidity, or flooding (which requires a separate policy) is almost always excluded.
This is precisely why immediate, detailed documentation is so critical. A professional restoration company like Sparkle provides the detailed records, photos, and moisture readings your insurance adjuster needs to process the claim correctly. We help you build the strongest possible case to maximize the coverage you are entitled to.
When you're facing the chaos of water damage and the threat of mold, you need a partner with proven expertise and unwavering integrity. At Sparkle Restoration Services, we don't just restore properties; we restore your peace of mind. As an IICRC Master Certified firm and a BBB Torch Award Winner for Ethics, we are the trusted Orange County experts committed to "Turning Chaos Into Calm, Fast."
If you need 24/7 emergency services or wish to schedule a free consultation for your restoration or remodeling project, contact Sparkle Restoration Services today for a consultation.
Ready to create a space that’s as beautiful as it is functional? Schedule your complimentary design consultation today by visiting Ready to Work with Sparkle?