
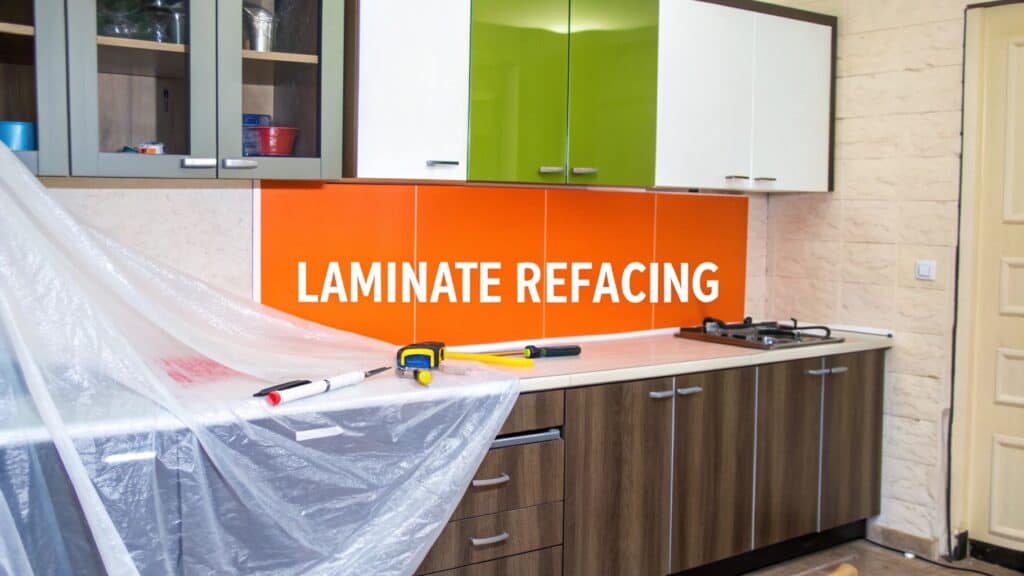
Refacing your kitchen cabinets with laminate is one of the smartest, most cost-effective ways to achieve a high-end transformation without turning your home into a construction zone for weeks. As licensed general contractors serving Orange County, we follow a precise process: a new, durable laminate finish is applied over your existing cabinet boxes—assuming they’re structurally sound—and then the old doors and drawer fronts are replaced with brand-new, perfectly matching ones.
The result is a kitchen that looks and feels custom-built, but for a fraction of what a full tear-out and replacement would cost. This approach embodies our commitment at Sparkle Restoration Services to deliver exceptional value and turn remodeling chaos into calm.
Why Refacing Is a Smart Kitchen Upgrade
For most of us here in Orange County, the kitchen is more than just a place to cook. It’s the true heart of the home, a hub of daily life. However, the thought of dealing with weeks of dust, noise, and demolition is enough to make any homeowner postpone an update. That’s precisely where refacing cabinets with laminate comes in as the perfect solution, beautifully blending a fresh new look with practical efficiency.
The core concept is simple yet powerful. If your cabinet boxes are still in good shape, why tear them out? Refacing preserves the functional layout you already know and love while completely revitalizing its appearance.
The Financial and Practical Advantages
The most significant driver for homeowners choosing refacing is the substantial cost savings. A full cabinet replacement involves demolition, all-new materials, and extensive labor, which can quickly consume a remodeling budget. In contrast, refacing can cost 30-50% less. That’s capital you can now allocate toward other high-impact upgrades, like the quartz countertops you’ve been eyeing or new custom flooring.
This trend isn’t just a local phenomenon; it’s part of a global shift toward smarter home improvements. The cabinet resurfacing market was valued at approximately USD 9.2 billion in 2024 and is projected to soar to USD 15.7 billion by 2033. Homeowners are recognizing the value, with the residential sector accounting for about 78% of that demand.
Beyond savings, the timeline is a game-changer. Gutting a kitchen can take weeks, leaving you without a functional space. A professional laminate refacing project? Our team is typically in and out in just 3-5 days, minimizing disruption to your daily life. This efficiency is a cornerstone of the exceptional service we deliver through our remodeling and construction services.
To provide a clearer picture, here’s a quick breakdown of how the two approaches compare.
Laminate Refacing vs. Full Cabinet Replacement: At a Glance
| Factor | Laminate Refacing | Full Cabinet Replacement |
|---|---|---|
| Cost | 30-50% less than replacement | Highest cost option |
| Timeline | Typically 3-5 days | Can take 4-8 weeks or more |
| Disruption | Minimal; kitchen remains usable | Major; kitchen is out of commission |
| Eco-Impact | Sustainable; reuses existing boxes | High waste; sends old cabinets to landfill |
| Layout Changes | Not possible; keeps existing layout | Fully customizable; can change layout |
| Best For | Structurally sound cabinets, budget-conscious updates | Outdated layouts, damaged cabinet boxes |
As you can see, if your current kitchen layout works for you and your cabinets are structurally sound, refacing offers a compelling set of advantages without the headaches of a full-scale renovation.
Key Benefits of Laminate Refacing
- Cost-Effectiveness: Achieve the look and feel of a brand-new kitchen for a fraction of the price of custom cabinetry.
- Speed and Convenience: Your kitchen is transformed in days, not weeks, with far less mess and disruption to your family.
- Durability and Low Maintenance: Modern high-pressure laminates are incredibly tough. They are engineered to resist stains, moisture, and chipping, making them perfect for busy households with kids and pets.
- Eco-Friendly Choice: By reusing your cabinet boxes, you’re keeping perfectly good materials out of the landfill. It’s a greener way to renovate.
- Enhanced Home Value: An updated, modern kitchen is a massive selling point for homebuyers in Orange County. Refacing delivers an impressive return on investment by significantly boosting your home’s appeal.
Choosing the Right Laminate for Your Home
This is where your design vision truly begins to take shape. Choosing the perfect laminate goes beyond just picking a color; it’s about performance, texture, and how the final product will look and feel in your Orange County home. A thoughtful decision here is what separates a decent refresh from a stunning transformation that stands up to daily life.
The world of laminates is surprisingly vast, with options for nearly any aesthetic you can imagine. When you’re refacing cabinets with laminate, you’ll primarily encounter two categories, and understanding the difference is key to a lasting result.
High-Pressure vs. Low-Pressure Laminate
Understanding the difference between High-Pressure Laminate (HPL) and Low-Pressure Laminate (LPL) is the first step toward a durable, long-lasting finish.
- High-Pressure Laminate (HPL): This is the undisputed champion for high-traffic areas like kitchens. HPL is crafted by fusing multiple layers of paper with resin under extreme heat and pressure, then finished with a decorative layer and a tough protective overlay. The result is a highly durable surface that resists impacts, heat, scratches, and moisture. This makes it the premier choice for cabinet doors and drawer fronts.
- Low-Pressure Laminate (LPL): Also known as melamine, LPL is made by fusing a single decorative paper layer directly onto a substrate like particleboard. While it’s still a solid material, it’s not as robust as HPL, making it better suited for low-impact surfaces like the vertical sides of cabinet boxes or the interior of shelves.
For a busy family kitchen in Irvine or a well-used entertainment center in Newport Beach, our team at Sparkle—as BBB Torch Award Winners for Ethics—almost always recommends HPL for every main surface. It’s a simple way to guarantee your investment lasts.
Finding Your Perfect Finish and Texture
Once you’ve determined the type of laminate, the design process begins. The finish you select can completely change the atmosphere of a room, unifying everything from your countertops to your flooring.
A crucial part of this is ensuring cohesion. Consider how your new cabinet finish will complement your floors. For a seamless look, it’s worth exploring our expert flooring sales and installation services to see how different materials can harmonize with your cabinet choices.
Here are a few popular directions you can take:
- Matte vs. Gloss: A matte finish provides a soft, modern look that diffuses light and is excellent at hiding fingerprints—incredibly practical. High-gloss, on the other hand, reflects light around the room, creating a sleek, contemporary feel that can make a smaller kitchen feel more spacious.
- Smooth vs. Textured: Smooth laminates are clean and classic. However, textured options have become incredibly popular because they do an amazing job of mimicking natural materials. You can find laminates with highly realistic wood grains or even stone-like textures that add significant depth and character.
Pro Tip from Sparkle: Always order samples. A color that looks perfect online can appear completely different under your home’s lighting. Place the samples on your existing cabinets and observe them at various times—in bright morning sun and under artificial light at night—to ensure you’ll love the final result.
The demand for these versatile materials continues to grow. The global furniture laminate market was on track to hit approximately USD 2.8 billion by 2025, a testament to its role in modern design. This growth is also fueled by new eco-friendly laminates, providing more sustainable options for your home.
The Cabinet Refacing Process: From Start to Finish
Embarking on a project like refacing cabinets with laminate can feel daunting, but a structured process makes it manageable. As a licensed general contractor and IICRC Master Certified firm, we know that success comes from a step-by-step approach where each phase builds on the last. It’s less like a massive construction project and more like a precise craft that completely transforms your kitchen with surprisingly little disruption.
Here’s an inside look at the key phases our Sparkle team uses to achieve a perfect, long-lasting finish every time. This isn’t just about making old cabinets look new; it’s about delivering a result that will endure for years to come.
Meticulous Preparation: The Foundation of a Flawless Finish
You’ve likely heard it before: “It’s all in the prep work.” For laminate application, that’s the absolute truth. The primary goal is to create a perfectly clean, smooth, and slightly abraded surface that allows the contact cement to form an unbreakable bond.
First, we empty all cabinets and clear the countertops. Then, we carefully remove all cabinet doors and drawer fronts, labeling each one to ensure it returns to its original position. All hardware—hinges, knobs, pulls—is removed and stored safely.
Next, we turn our attention to the cabinet boxes. This is a critical stage with several non-negotiable actions:
- Thorough Degreasing: Kitchens are magnets for grease and oil, which are the number one enemy of adhesion. We use a professional-grade degreaser to meticulously clean every square inch of the cabinet frames and side panels.
- Surface Repairs: Any nicks, dings, or deep scratches on the cabinet boxes are filled with a high-quality wood filler. Once cured, these spots are sanded perfectly smooth. Skipping this step would allow every imperfection to telegraph through the new laminate.
- Sanding for Adhesion: The final prep step is to lightly scuff all surfaces with medium-grit sandpaper—around 120-grit is ideal. The purpose isn’t to strip the old finish, but to create a “tooth” for the adhesive to grip.
Precision Measurement and Cutting
Once the cabinet boxes are prepped, it’s time to measure and cut the laminate. This part of the job demands absolute precision. The old adage, “measure twice, cut once,” could not be more critical. We measure every single surface—face frames, stiles, rails, and end panels.
A key professional technique is to cut each piece of laminate slightly oversized, usually by about one-half to one inch on each side. This overhang provides a margin for error and guarantees full coverage. The excess is trimmed off perfectly with a router later.
Cutting laminate without chipping the decorative top layer is a common challenge. While a fine-toothed blade on a table saw can work, our team often uses specialized laminate slitters or scoring knives to achieve the cleanest cuts possible, avoiding the frustrating chipping that can ruin a piece of material.
The Art of Laminate Application
This is where the transformation takes shape. Proper laminate application ensures a smooth, bubble-free surface that will withstand daily use. The key to this step is contact cement, a powerful adhesive that creates an instant, permanent bond.
The process is methodical and requires patience:
- Apply a thin, even coat of contact cement to both the back of the laminate piece and the cabinet surface.
- Allow the adhesive to dry until it’s just tacky to the touch, which typically takes 15–20 minutes. You should be able to touch it without any glue transferring to your finger.
- This next part is crucial. Carefully align the oversized laminate piece over the surface. We use thin wood dowels or “slip sheets” as spacers to prevent premature contact. Once contact cement touches itself, the bond is immediate—there are no second chances.
- Remove the spacers and, starting from the center and working outward, press the laminate down firmly.
The image below illustrates the most important final step in this phase: applying even pressure to guarantee a solid bond.
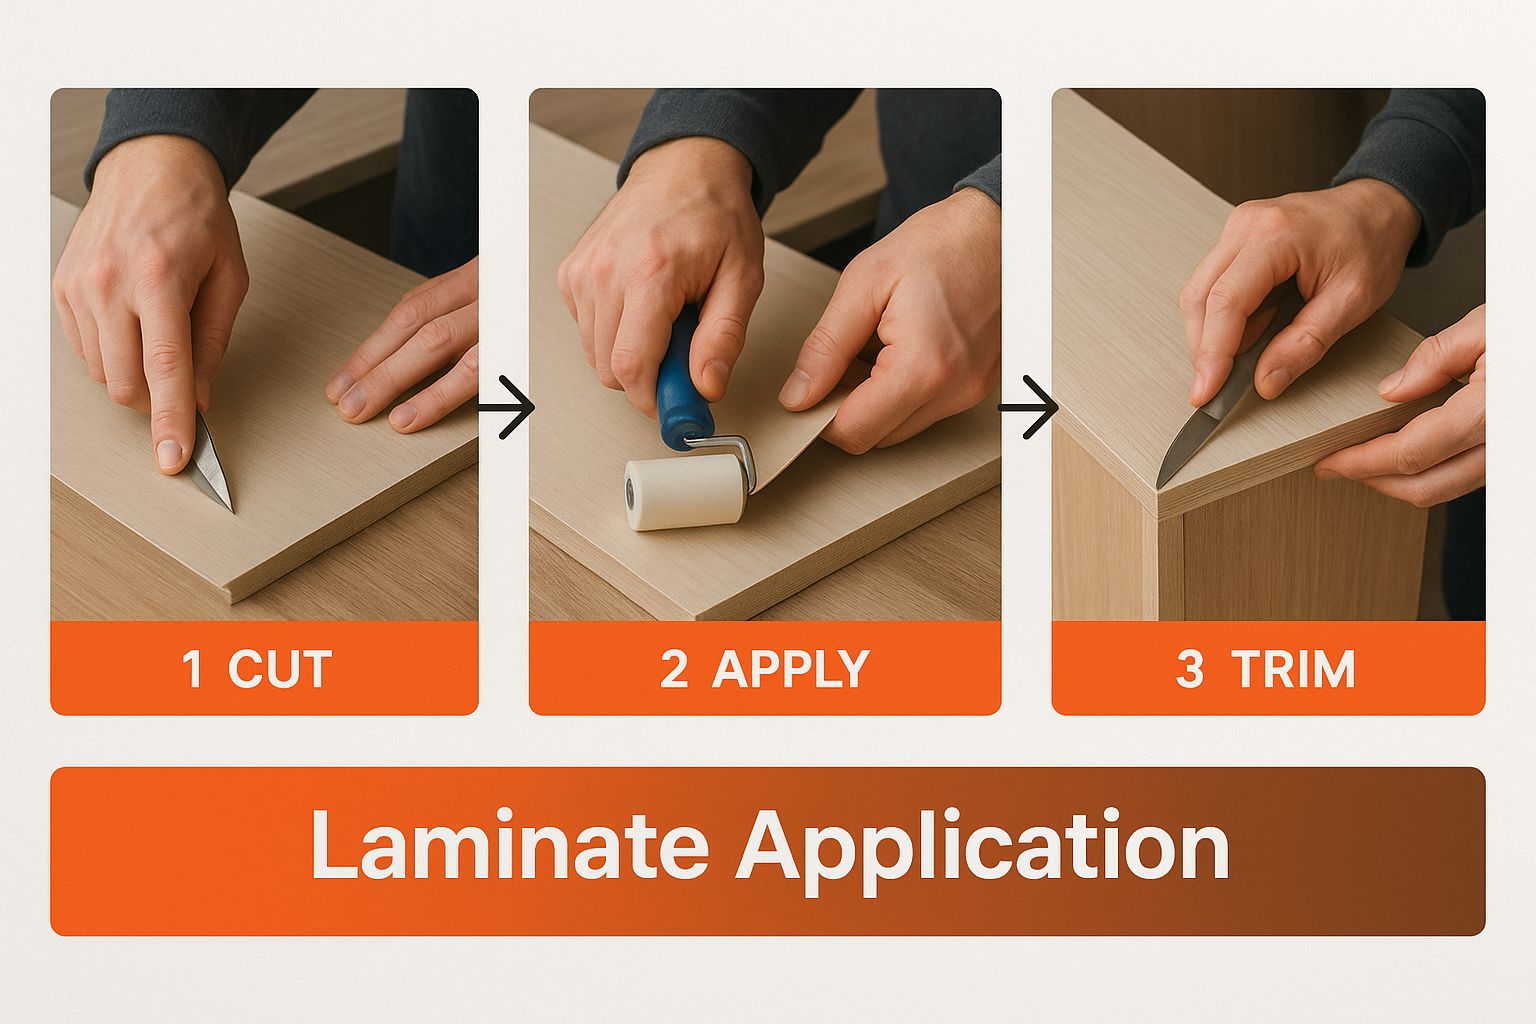
This demonstrates the essential role of a J-roller. It forces out any trapped air bubbles and ensures 100% adhesion across the entire surface.
Professional Finishing Touches
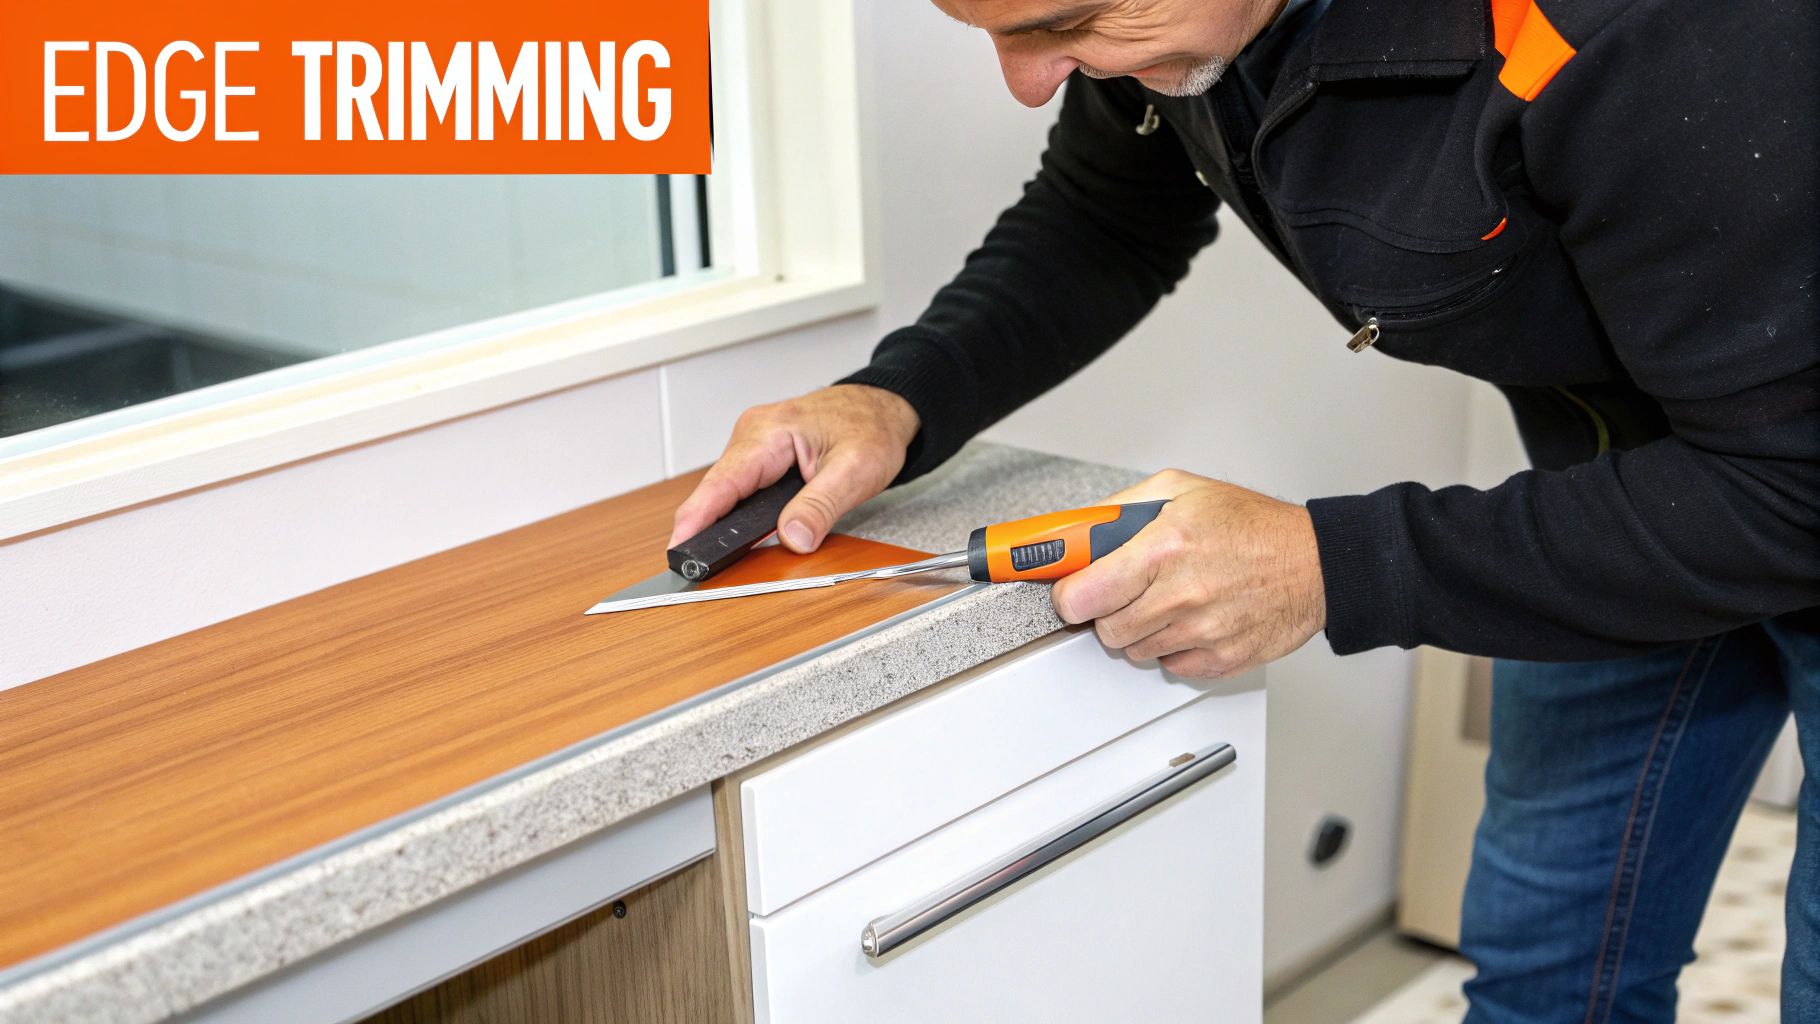
These final steps are what distinguish a DIY-looking job from a true professional installation. With the laminate securely bonded, it’s time to address the intentional overhang on each piece.
The industry-standard method is to use a router with a flush-trim bit. The bit’s small bearing rides along the edge of the cabinet box, trimming the excess laminate perfectly flush for a seamless look. For tricky inside corners where a router can’t fit, a sharp file held at a slight downward angle completes the job.
Expert Insight: After trimming, we always use a file to gently ease the sharp edges of the new laminate. This small detail, known as “breaking the edge,” makes the surface feel smoother to the touch and dramatically reduces the chances of future chipping.
Once every surface is trimmed and filed smooth, the new doors, drawer fronts, and hardware are installed. This final step completes the transformation, leaving you with a kitchen that looks brand new. To see how these meticulous steps come together on a real project, view the stunning results from our recent kitchen remodel in Huntington Beach, CA.
Get Your Tools and Materials Ready for the Project
The difference between a cabinet refacing job that looks professionally executed and one that screams “DIY disaster” often comes down to the tools you use. Having the right equipment and materials on hand from the very start is the secret to a smooth, high-quality finish.
Walking into a home improvement store without a detailed list is a recipe for frustration. This guide will ensure you’re fully prepared for every step, from initial prep work to the satisfying final touches. Cutting corners on your toolkit will only lead to headaches and a finish you won’t be proud of.
The Non-Negotiables: Core Tools for the Job
These are the absolute must-haves. You may have some in your garage already, but a few are crucial for preparing surfaces for laminate.
- Measuring Tape & Straightedge: Precision is everything. A quality tape measure and a long metal straightedge are your best friends for accurate measurements and perfectly straight cuts.
- Screwdriver or Cordless Drill: A huge time-saver for removing every cabinet door, drawer front, and piece of hardware.
- Degreaser & Cleaning Rags: Kitchen cabinets are covered in years of grease and grime, the number one enemy of good adhesion. Every surface must be squeaky clean.
- Putty Knife & Wood Filler: Your cabinet boxes likely have dings, scratches, or old hardware holes. Use wood filler to patch these imperfections for a perfectly smooth canvas.
The Pro-Level Gear: Specialized Equipment
This is where you graduate from a simple DIYer to someone capable of achieving a factory-grade finish. These specialized tools are what professionals use to get crisp edges and a flawless bond.
- Laminate Slitter or Fine-Tooth Saw Blade: A laminate slitter is a hand tool that scores and snaps laminate with a clean edge. If using a table saw, you must have a fine-tooth blade designed for laminates to avoid ugly chipping.
- Router with a Flush-Trim Bit: This is the MVP of the project. The bearing on the bit rides along the edge of your cabinet box, trimming the oversized laminate sheet perfectly flush for a seamless, professional look.
- J-Roller: Do not skip this. This small, hard rubber roller is used to apply firm, even pressure to the laminate, squeezing out trapped air bubbles and ensuring the contact cement creates a permanent, total bond.
Sparkle’s Pro Tip: Don’t want to buy a high-end router or laminate slitter for a one-time project? Consider renting them. You’ll gain access to professional-grade equipment for a fraction of the cost, making a massive difference in the final result.
Getting It to Stick: Adhesives and Abrasives
The materials you choose are just as important as your tools. The right adhesive will keep your laminate locked in place for years, and the right sandpaper will prep the surface for a perfect bond.
You’ll need a couple of different sandpaper grits. Start with a medium 120-grit sandpaper to scuff up the old cabinet finish, creating a “tooth” that helps the contact cement grab hold. For smoothing wood filler patches, a finer 220-grit works beautifully.
When it comes to the adhesive, your main choice is Contact Cement. Solvent-based formulas offer an incredibly strong, permanent bond but come with serious fumes—excellent ventilation is required. Water-based options have less odor and are easier to clean but may not have the same aggressive initial tack. For kitchens, the industry standard is a high-quality, non-flammable solvent-based cement for its reliability.
To help you get organized, we’ve put together a comprehensive checklist.
Project Toolkit and Material Shopping List
Before you begin, run through this list to ensure you have everything you need. Being prepared means you can focus on the work itself without making extra trips to the hardware store.
| Item Category | Specific Item | Sparkle’s Pro Tip |
|---|---|---|
| Measurement & Layout | Tape Measure | A self-locking tape makes measuring solo much easier. |
| Measurement & Layout | Metal Straightedge (at least 48″) | Use this for guiding your utility knife for perfectly straight scores. |
| Demolition & Prep | Cordless Drill/Driver with Bits | Have a full set of bits to match all your existing hardware screws. |
| Demolition & Prep | Degreasing Cleaner | Simple Green or TSP (trisodium phosphate) are excellent choices. |
| Demolition & Prep | Putty Knife & Wood Filler | Choose a stainable/paintable filler if any edges will be visible. |
| Cutting & Trimming | Laminate Slitter or Table Saw | If using a saw, a new, fine-tooth blade is a must to prevent chipping. |
| Cutting & Trimming | Router with Flush-Trim Bit | Make sure the bearing on your bit spins freely before each use. |
| Cutting & Trimming | Utility Knife with Extra Blades | A sharp blade is a safe blade. Change it often. |
| Application & Adhesion | J-Roller | The heavier, the better. Apply as much pressure as you can. |
| Application & Adhesion | Contact Cement (Solvent-Based) | Buy more than you think you need. It’s better to have extra than to run out mid-job. |
| Application & Adhesion | Disposable Paint Brushes | You’ll go through a few of these applying the cement; don’t buy expensive ones. |
| Sanding & Finishing | Sandpaper (120-grit & 220-grit) | A sanding block helps apply even pressure and saves your hands. |
| Safety Gear | Safety Glasses & Gloves | Non-negotiable, especially when routing and working with cement. |
| Safety Gear | Respirator Mask | A must if you’re using solvent-based contact cement. Protect your lungs. |
Taking the time to gather these items will make the entire project less of a chore and more of a rewarding process. When you see how these tools come together, the result is well worth the effort. You can see what’s possible in this recent kitchen, bathroom, and flooring upgrade in Irvine, CA.
Understanding the Costs and When to Hire a Pro
One of the primary motivations for refacing cabinets with laminate is saving significant money compared to a full rip-and-replace remodel. But before diving in, it’s crucial to have a realistic understanding of the investment, whether you’re planning a DIY project or partnering with a professional.
Let’s break down the numbers and identify those key moments when calling an expert isn’t just easier—it’s essential for protecting your investment.
The demand for cabinet refacing is booming for good reason. The market hit a value of USD 5.2 billion in 2024 and is projected to climb. This isn’t a fleeting trend; it’s a smart move for homeowners who want a high-end kitchen look without the headache and waste of total demolition. For more details, you can discover more about on Verified Market Reports.
A Realistic Look at Your Budget
The final price tag on a DIY laminate refacing project depends on two main factors: the size of your kitchen and the quality of the materials you select. For a standard kitchen here in Orange County, you can expect costs to fall within this range.
- Laminate Sheets: This will be your largest material expense, typically running $2 to $6 per square foot. Opting for premium high-pressure laminate (HPL) with modern textures will place you at the higher end.
- Adhesive and Tools: Do not skimp here. Quality contact cement, a J-roller, a flush-trim router bit, and other essentials will likely add $200 to $400 to your total.
- New Doors and Drawer Fronts: This is the largest variable. A complete set of new, pre-laminated doors and drawer fronts can range from $2,000 to $5,000+, depending on style and quantity.
All in, a typical DIY project might land between $3,000 and $7,000. In contrast, hiring a professional team for the same kitchen will generally cost between $7,000 and $15,000. While the upfront cost is higher, that price secures professional labor, a warranty, and the peace of mind that the job will be done right the first time.
A professional’s experience can save you from costly do-overs. One bad cut on a large laminate sheet or a surface that fails to bond correctly can easily set you back hundreds of dollars—not to mention the frustration.
Knowing When to Call a Professional
While tackling a project yourself can be incredibly rewarding, there are definite times when hiring a licensed general contractor like Sparkle Restoration Services is the smarter, safer, and ultimately more valuable decision.
- Your Cabinet Boxes Are Damaged: Water stains, rot, or structural weakness are red flags. These issues must be addressed before any cosmetic work begins. A professional can properly assess the damage and perform necessary repairs, ensuring a solid foundation.
- You Have a Complex Kitchen Layout: Awkward angles, curved cabinets, or intricate trim work are challenging. Laminating these surfaces perfectly requires specialized tools and a level of skill most DIYers don’t possess.
- You Want a Guaranteed, Warrantied Result: When you hire a reputable company, your project comes with a warranty. If the laminate starts to peel or bubble down the road, you’re covered. That protection for your investment is invaluable.
- Your Time Is a Premium: A professional crew can reface an entire kitchen in just a few days. For busy Orange County homeowners, the value of avoiding a weeks-long DIY project that disrupts your home cannot be overstated.
Ultimately, the goal is a beautiful, durable kitchen. If your project requires more than a simple cosmetic fix, our design-build services offer a complete solution, ensuring every aspect of your renovation is handled by experts. And if you’re still weighing options like painting versus refacing, knowing how to hire the right professional is crucial. For an in-depth guide on painting services, check out this resource on finding the best cabinet painter.
Got Questions About Laminate Cabinet Refacing? We’ve Got Answers.
As Orange County’s trusted remodeling experts, we’ve helped countless homeowners revive their kitchens by refacing cabinets with laminate. Over the years, we’ve noticed the same excellent questions come up time and again.
We’ve compiled the most common ones here. Consider this your source for clear, straightforward answers from a team that lives and breathes this work—as IICRC Master Certified and licensed general contractors, you can trust you’re getting practical, reliable information.
How Durable Is Laminate Refacing Compared to Painted Cabinets?
This is perhaps the most common question we receive, and the answer is clear: modern laminate is significantly more durable than paint.
High-pressure laminate (HPL) isn’t just a decorative surface; it’s an engineered material built to withstand the demands of a busy kitchen. It forms a hard, non-porous shield that resists moisture, stains, heat, and chipping. While painted cabinets look beautiful initially, they are merely a surface coating. They are far more susceptible to scratches from keys, dings from pots and pans, and wear around the knobs and pulls used daily.
Think of it this way: paint is a surface treatment, whereas laminate is protective armor for your cabinets. For any family that actively uses their kitchen, laminate offers superior longevity and requires far less maintenance to keep it looking new.
Can I Reface Cabinets That Aren’t Made of Wood?
Yes, in most cases, you absolutely can. This is one of the greatest advantages of refacing cabinets with laminate. The process works beautifully over a variety of structurally sound materials, not just solid wood.
We regularly and successfully apply laminate over:
- MDF (Medium-Density Fiberboard): A very common cabinet material that provides a stable, smooth base for laminate.
- Particleboard: As long as it has not sustained water damage causing it to swell or crumble, it is a perfectly suitable substrate.
- Existing Laminate or Thermofoil: There is no need for the messy process of stripping the old surface. We simply prep it and apply the new laminate directly over it.
The secret to success lies not in the cabinet box material, but in the preparation. The existing surface simply needs to be solid, clean, degreased, and scuffed with sandpaper. This creates the perfect “tooth” for the contact cement to grip, ensuring the new laminate forms a permanent bond, regardless of what’s underneath.
The only exception is major structural damage. If your cabinet boxes are warped from a leak or are structurally failing, refacing is not the solution. Those boxes must be repaired or replaced first.
What’s a Realistic Timeline for a Professional Refacing Project?
The efficiency of a professional refacing job is a huge benefit for our clients. A full cabinet replacement can turn your kitchen into a construction zone for weeks, but laminate refacing is remarkably fast.
For a typical kitchen in Orange County, a professional crew like Sparkle can complete the entire project in just 3 to 5 days. This short timeframe includes everything: prepping the cabinet boxes, precisely cutting and applying the new laminate, and installing all your new doors, drawer fronts, and hardware. This minimal disruption to your home life is one of the most compelling reasons homeowners choose this option.
Does Refacing Cabinets With Laminate Actually Increase Home Value?
Absolutely. A kitchen update is consistently one of the best home improvements for return on investment. Cabinet refacing delivers that stunning, brand-new kitchen look for a fraction of the cost, which maximizes your ROI.
In a competitive real estate market like Southern California, a modern, clean kitchen is a massive selling point. It makes your home stand out to potential buyers, can help justify a higher asking price, and often leads to a faster sale. When you transform a dated kitchen into a fresh, contemporary space, you are making a smart and direct investment in your home’s value.
Your home deserves a transformation handled with proven expertise and an unwavering commitment to quality. If you’re ready to explore a beautiful, durable, and efficient kitchen upgrade, the team at Sparkle Restoration Services is here to help you bring that vision to life.
Schedule your complimentary design consultation with our Orange County remodeling experts today!
Ready to create a space that’s as beautiful as it is functional? Schedule your complimentary design consultation today by visiting Ready to Work with Sparkle?